5.27 Maytas ESFA Release Notes
Note regarding submissions
We would like to remind providers to create a submission early and check for any errors using reports from the FIS. After submission to the ESFA, providers should check that data has submitted correctly using the available reports. Providers should check that all their expected starts and completions are submitted correctly, and that start and outcome payments correctly match the PFR.
Our support desk gets extremely busy in the days prior to the submission deadlines, and although we try and prioritise submission-related queries, we cannot guarantee assistance if queries are sent late. If you do encounter any issues, please ensure that you contact Maytas Support as soon as possible, as we can only rectify issues of which we are aware. We also recommend checking Maytas Communities regularly for information on any known issues and solutions. Tribal cannot be held responsible for any issues caused by your failure to comply with this advice.
Technical specification
The latest Maytas and Maytas Hub technical specification can be found here.
Once the upgrade has been completed, the version number should be checked to ensure it has been successful.
- Start Maytas and go to Support on the toolbar.
- Click About.
- The version numbers should read 5.27.8811.1. If you have any other version, please ensure you have followed the upgrade instructions correctly. If you require assistance, please contact Maytas Support.
It is the responsibility of customers to ensure that users carry out any required user acceptance testing and sign off on the upgrade.
Complete the Upgrade
Features Added in the Upgrade
These are the main updates in the upgrade:
- ILR validation results table
- Financial Planning update
- Scheduler SITS sync
- SITS integration updates
- Engage integration update
- DfE integration updates
- AS bulk upload - new fields
- Reports Library 1.0.4.7
- Fixes to a number of issues
Import Funding Information
The process for importing the required funding information into Maytas is as follows:
- The latest LARS should be imported.
- The latest postcode data should be imported.
- Once all data has been imported, ensure that the funding cache is refreshed (either on a database schedule or a manual update out of working hours).
Import LARS
The LARS should be imported as follows:
- Download the latest LARS MDB file.
- In Maytas, go to Exports on the toolbar.
- On the ILR Tools panel of the ribbon, go to Uploads | Upload Funding Information | Upload LARS (Version 8 or 9).
- Browse to and select the downloaded LARS file and click Open.
- The file will now be imported. Click OK on the message which appears.
Progress on the import can be checked by going to Home | Server Tasks | Server Jobs. Typically it will take several minutes.
Import Postcode File
- Obtain the postcode uplift factors file - Download the zip file under 2023 to 2024 uplift factors by postcode and LLSOA: CSV files.
- In Maytas, go to Exports on the toolbar.
- On the ILR Tools panel of the ribbon, go to Uploads | Upload Postcodes| Upload Post Code Data (2023/24).
- Browse to and select the postcode uplifts zip file and click Open.
- The file will now be imported. Click OK on the message which appears.
Progress on the import can be checked by going to Home | Server Tasks | Server Jobs. Typically this will take several minutes.
Note on the Funding Cache
By default, the funding cache will update overnight so that funding information in Maytas uses the newly-imported FIS and postcode information. Please check with your system administrator if you are unsure if or when the funding cache is updated on your system. You can also manually set the funding cache to update by going to Management | Profiles and clicking the Funding Cache button, though please be aware that this may take a long time and may use a large amount of system resources, which could affect performance for other users on the system.
Maytas 5 Version 5.27.8811.1 Release Notes
BKSB User Creation
The BKSB integration is now able to create BKSB users from Maytas learner records. This requires a BKSB Integration licence.
-
Open the learner record you wish to create a BKSB user for.
-
In the Third Party section of the ribbon, click the BKSB button and select Create user.
-
The Create User window will appear.

If the learner already has a BKSB user associated with them, this will be displayed in the Username box, otherwise the Maytas Hub username will be shown (this can be edited).
The email address defaults to the value in TRAINEE.EMAIL, but can also be edited.
Ticking the Auto Enrol Courses checkbox will automatically enrol the learner on courses within BKSB.
-
Clicking the Create User button will attempt to create a user in BKSB using the entered username. If it is already taken, you will be prompted to edit the username and try again. If the username is not already in BKSB, the user will be created and a message will appear to confirm successful creation.
The user's password will be set to the default BKSB password, which is set in the admin section of the BKSB site.
Maytas 5 Version 5.27.8810.1 Release Notes
ILR Validation Results Table
A new table called TRAINEE_ILR_VALIDATIONRESULTS has been added to the database, which stores the results of learners' ILR validation.
The table is initially empty and is populated when a learner's record is opened or saved. The date on which a learner's validation results were last refreshed is stored in TRAINEEPOT2.ILR_VALIDATION_LASTDATE.
An accompanying report is available to display validation results (click here for details).
Financial Planning - New Cohort Group Aim Fields
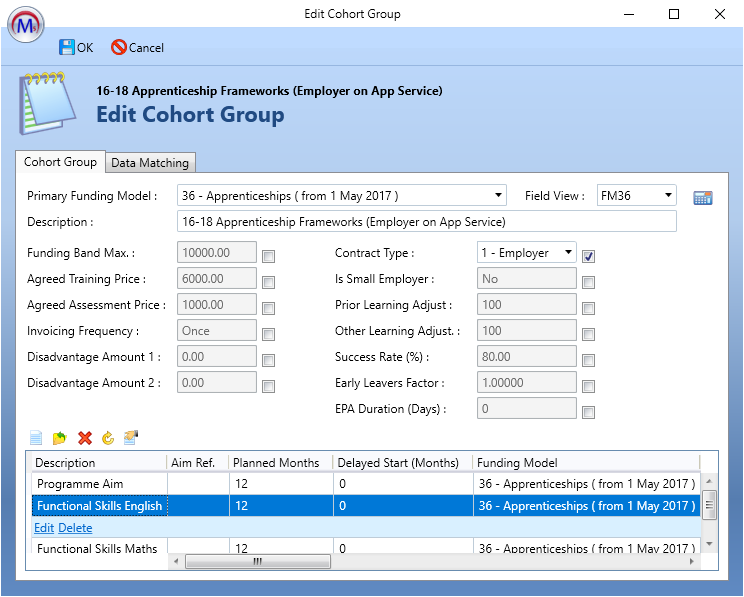
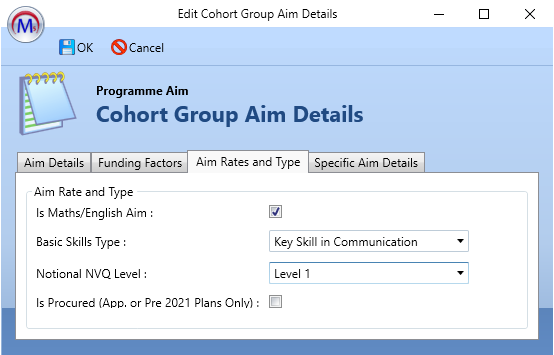
Two new fields - Basic Skills Type and Notional NVQ Level - have been added to the cohort group aim screen in Financial Planning (for funding model 36 plans only). This is because the rates for English and maths aims on an apprenticeship are now dependent on the basic skills type and notional NVQ level, whereas previously the rate was the same across all English and maths aims.
Existing 2023/24 plans and newly-created plans have the two new fields set to default values where the cohort group aim description is either Function Skills Maths or Function Skills English. When the What If values are updated for the plan, the new uplifted rates are used where the aim starts on or after 01/01/2024, whereas starts before this use the old rate.
To manually edit the two new fields:
-
Go to Management | Financial Plans.
-
Open the required funding model 36 plan (or create a new one).
-
Go to the Cohort Groups tab.
-
Select the required cohort group and click Edit.
-
Select the required aim in the grid at the bottom of the window and click Edit.
-
Go to the Aim Rates and Type tab.
-
Complete the Basic Skills Type and Notional NVQ Level fields as required.
-
Click OK, then click OK again.
-
Click Apply.
-
Go to the What If Values tab and click the
 button to refresh the results.
Scheduler - SITS Sync
The Scheduler has a new option to perform a sync with SITS on a schedule. This requires the SITS integration module to be enabled for the user in permissions.
To create a SITS Sync schedule:
-
Go to Tools | Scheduler.
-
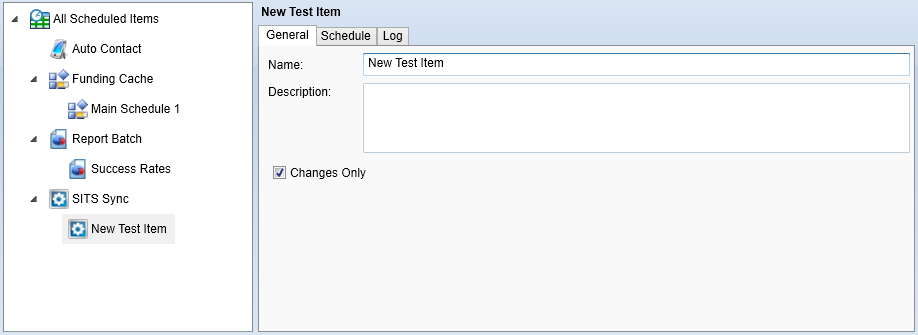
On the ribbon, go to New | SITS Sync. A new SITS schedule will open.
-
Enter a name and description for the schedule as required. The Changes Only checkbox is ticked by default, which will only sync records that are new or have changed. If the box is unticked, all records will be synced.
-
Go to the Schedule tab. This is where you can configure when (and how often) the schedule will run.
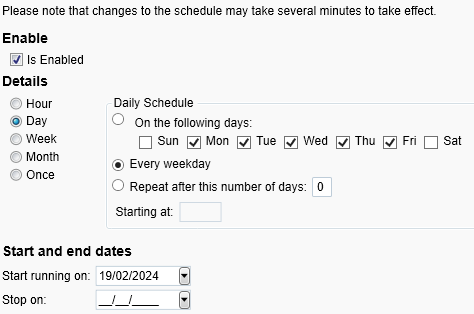
Set the schedule in the Details section. It can be set to run periodically (e.g. every day, week, etc) or just once at a specified time. Please note that if you intend to start the schedule immediately, the start time should be at least 10 minutes in the future to ensure it is picked up by the system
-
The Log tab shows a history of when the schedule has been run.
-
Click Apply on the ribbon to save the schedule.
SITS Integration Sync Enhancements
The SITS integration sync screen can now be configured to include an option to get the full ILR record for learners. Additionally, the address type to use in Maytas can be set to prioritise the home address or contact address from SITS.
To configure these options:
- Click the M5 button at the top left and select Options.
- Go to SITS Integration on the left (in the Maytas 5 section).
- To enable the ILR option, tick the Show ILR config and ensure the toggle button is set to ON.
- To set the address type to use, tick the Address type to use config and enter either home or contact in the textbox. This determines which address will be prioritised - i.e. if only one address is entered in SITS then that will be used regardless of the config, but if both addresses are entered then the one specified in the config will be used.
- Click OK.
With the Show ILR option enabled, when you go to Management | Synchronise there will now be a Get ILR Data checkbox which is unticked by default. Ticking this box will include the full ILR record when the Synchronise button is clicked.

Lookup mappings
Lookup mappings between SITS and Maytas can now be specified in a table:
-
Go to Tools | Table Edit.
-
Select LOOKUPMAPPING from the dropdown box.
-
Click the
 button to add a new row.
 -
Complete the fields in the row as follows:
-
LOOKUPMAPPINGID - Leave this as the default, as a value will be generated when the row is saved
-
TABLENAME / FIELDNAME - The table and field names of the Maytas field you wish to map lookups for
-
MAYTASSHORTSTRING - The short string value of the lookup you wish to map
-
INCOMINGVALUE - The short string value from SITS
-
SOURCE - This should be SITS
-
TYPE - For the basic sync, leave this blank. For the full ILR sync, enter ILR.
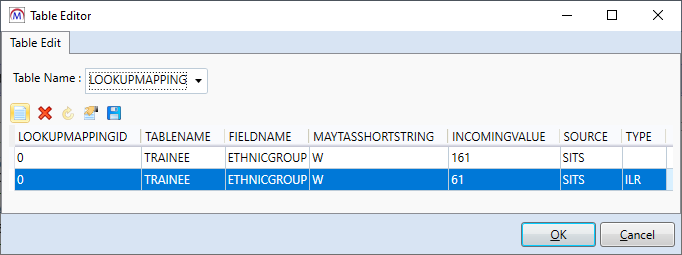
It is possible for a SITS learner to have different field values for the basic sync and the full ILR sync, and so a single lookup value in Maytas may need two corresponding rows for the mapping (i.e. one for the basic sync and one for the full ILR sync). For example, in the screenshot below the Maytas short string value of W maps to a SITS value of 161 for the basic sync and 61 for the full ILR sync.
-
-
Add additional lookup mappings as required and click OK when finished.
Apprenticeship Service Bulk Upload - New Fields
The bulk upload for the AS Service now includes the following new fields:
-
Total off-the-job training time (hours)
-
Total reduction in off-the-job training time due to RPL (hours)
-
Have you reduced the actual apprenticeship duration due to RPL?
These fields have been added to the Apprenticeship Financial Record grid on the ILR 2023 App Starter tab.

Engage Integration - Open Third-Party Links in External Window
The Engage integration can now be configured to allow third-party links to open in an external window.
-
Go to Tools | Table Edit.
-
Select ENGAGETHIRDPARTYLINKS from the Table Name dropdown box.
-
Locate the USEEXTERNAL column and set the value to Y for each link that you want to open in an external window.
-
Click the
 button to save changes, then click OK.
DfE Integration - Separate Get Schools Option
The main Get Updates option no longer includes school data, as this is now included in a separate Get Schools option. This is due to the large amount of school data which can take hours to perform a full download. The option can be accessed by going to Management on the toolbar and selecting DFE | Get Schools.
The criteria when checking for existing schools has also been improved so that records are matched on URN rather than name, which prevents duplicate school records being produced.
Reports Library 1.0.4.7
Upgrade the Reports Library
How to Upgrade the Reports Library
The Reports Library upgrade should be performed by an admin user, which will upgrade the reports for all users.
To enable to the Upgrade reports button for an admin user:
- Go to Tools | Edit Permissions.
- Select the user or group which requires permission.
- Go to the Commands tab.
- Expand the Support section.
- Set the Report SQL Upgrade permission to Visible.
- Click Apply and restart Maytas for the change to take effect.
For customers who manage their own systems on-premise, it is strongly advised to take a database backup before performing the upgrade. This is not necessary for hosted customers as backups are taken regularly.
To upgrade the Reports Library:
- Go to Support on the toolbar.
-
Click Upgrade reports.

- You will asked to confirm that you wish to perform the reports upgrade SQL. Click OK to continue.
- A message will appear saying that a task has been created. Click OK.
-
You can check that the upgrade was successful by going to Home on the toolbar and then selecting Server Tasks | View Jobs.

If the Status indicates that the upgrade has failed, please do not continue with importing the reports package and raise an incident on theSelf Support Portalfor assistance.
- Next, the reports package must be imported. Go to Home on the toolbar and click Import on the Reports panel on the ribbon.
- This will display the Report Import wizard. Click +Add Files.
- Browse to the Maytas 5\Extras\Reports Library folder of the upgrade, select one of the following packages and click Open:
- For all reports, select Reports Library 1.0.4.7 (all reports).
- For ESFA and general reports only, select Reports Library 1.0.4.7 (ESFA and general reports).m5rep.
- Click Finish to import the reports. This process may take a long time (potentially upwards of 30 minutes) depending on the size of the reports package.
-
When the reports have finished importing, click Finish.
The import log may display various warning messages, which are generally a result of report formatting and other factors which do not impact how a report runs (e.g. The text box ‘textbox3’ extends beyond the bottom edge of its container.). Unless a message indicates that the import has failed, these warnings can safely be ignored.
New Report - Apprenticeship Retention
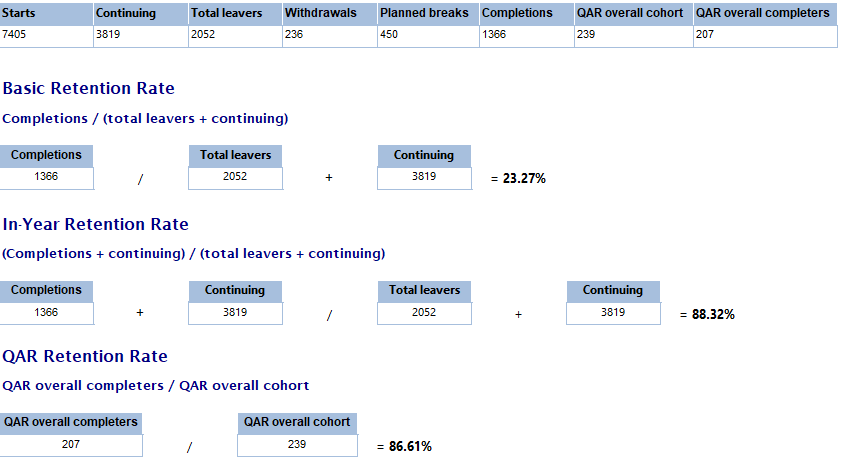
The Apprenticeship Retention report shows three different retention rates for apprentices. Each figure can be drilled down to show a list of the relevant learners.
The report can be found in the Quality folder of the Reports Library.
Parameters
-
Year - The contract year to show.
-
Centre - Filters by the selected centres.
-
Contractor - Filters by the selected contractors.
-
Ready to run - Set this to Yes when all other parameters have been set as required.
Details
The data in the report is all taken from the programme aim, using the following measures:
| Measure | Criteria |
|---|---|
| Starts | Start date is in the selected year |
| Continuing | Actual end date is null and the completion status is 1 or null (note that all learners must also be active during the selected year, so a continuing learner is unlikely to appear in the results for 5 years ago, whereas it is possible they may appear in the previous year) |
| Total leavers | Actual end date is in the selected year and completion status is 2, 3 or 6 |
| Withdrawals | Actual end date is in the selected year and completion status is 3 |
| Planned breaks | Actual end date is in the selected year and completion status is 6 |
| Completions | Actual end date is in the selected year and completion status is 2 |
| QAR overall cohort | Uses derived QAR data, where the overall cohort matches the selected year |
| QAR overall completers | Uses derived QAR data, where the overall cohort matches the selected year and the completion status used for the QAR (TRAINEEPPR.COMPSTATUSED) is 2 |
The rates are calculated as follows:
-
Basic retention rate - completions / (total leavers + continuing)
-
In-year retention rate - (completions + continuing) / (total leavers + continuing)
-
QAR retention rate - QAR overall completers / QAR overall cohort
New Report - ILR Validation
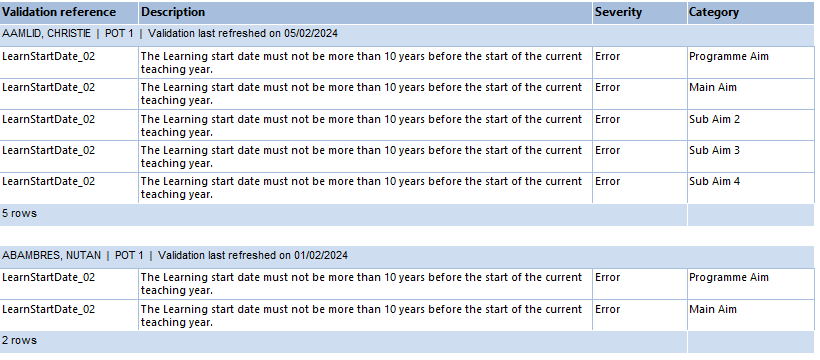
The ILR Validation Summary and Details reports show ILR validation errors and warnings that have been identified for learners. The Summary report can drill down to the Details report, or they can be run independently.
A learner record must be opened in Maytas for their validation to be populated or refreshed. As such, the report is intended to be used as a tool for identifying validation issues that may require attention. It is not intended to be a comprehensive list of all ILR validation issues, as there may be learners whose records have not been opened recently (i.e. their validation results may need refreshing).
Both reports can be found in the Audit folder of the Reports Library.

Above: ILR Validation Summary
Below: ILR Validation Details
Parameters
-
Validation severity - Whether to show errors, warnings or both.
-
Validation reference - Allows you to filter by specific validation rules.
-
In learning on or after / before - The report will include validation results for learners who are in learning at any point during this date range (inclusive). Apprenticeship learners in their gateway period during the date range are also be included.
Apprenticeship Accountability Framework Report Updates
Several changes have been made to the Apprenticeship Accountability Framework report so that it can more accurately reflect the figures produced by the ESFA.
Use of exported data
The report now uses exported ILR data as the basis for which apprentices to include (see below) for certain measures. The ILR export file that is used can be selected with the Export to use parameter, which defaults to the most recent export for the selected year (note that only ILR exports that have been output to an XML file can be selected).
Additionally, the parameter Use exported or live data determines whether the affected measures use the ILR field values (e.g. completion status, actual end date, etc) from the export file or whether they should use the live field values (i.e. what is currently displayed on the ILR tabs in Maytas).
Using exported data can help to reconcile results in Maytas more closely with the ESFA results, whereas using live data can help to predict what results would look like as the data currently stands.
For example, if you want to reconcile the full-year results for the previous contract year, selecting your most recent R14 export file for that year and choosing to use exported data would produce the most accurate match. If you wanted to show expected results for the current year, however, you would select your most recent export for the current year and choose to use live data.
Change to Total Apprentices calculation
The total apprentices counted for certain measures is now based on the apprentices included in the selected ILR export file, which better reflects how the ESFA determine the total apprentices. This may include learners who were not actually in learning during the selected contract year (e.g. late notified data changes).
The following measures use export files to determine the total apprentices:
-
Withdrawals
-
Off the job training
-
Learners past planned end date
-
Breaks in learning
-
End point assessment organisation data
The QAR measures do not use this, as they use a separate methodology based on the QAR specifications.
Note that the total apprentices will still be based on exported data when the Use exported or live data parameter is set to use live data, as the parameter only affects whether the field values for the learners is taken from live data or the export file.
Changes to learners past planned end date calculations
| Measure | Previous criteria | New criteria |
|---|---|---|
| Effective end date for year (ref. End Date) | N/A |
If selected year is not the current contract year, then 31st July of the selected year If selected year is the current contract year, then:
|
| Days past PED |
If actual end date is entered, then days between planned end date and actual end date If actual end date is not entered, then days between planned end date and current date |
If not in Gateway (i.e. completion status is not 1 or outcome is not 8 or achievement date is entered), then days between planned end date and (if actual end date is after End Date or is not entered, then (End Date, else actual end date) If in Gateway (i.e. completion status = 1 and outcome = 8 and achievement date is not entered), then days between planned end date and End Date |
| Apprentices past PED by 180 to 364 days | Days past PED >= 180 and < 365 |
If not in Gateway, Days past PED >= 180 and < 365 and completion status is 1 or 2 If in Gateway, days between planned end date and End Date >= 180 and < 365 |
| Apprentices past PED by 365+ days | Days past PED >= 365 |
If not in Gateway, Days past PED >= 365 and completion status is 1 or 2 If in Gateway, days between planned end date and End Date >= 365 |
Hub Report Generator - User Filtering
Report Generator for Maytas Hub will now filter results for the logged in user as follows:
-
If the user is an assessor and the report includes a table with TRAINEEID on it, the report filters by the assessor's caseload and their team's caseloads
-
If the user is an employer and the report includes a table with TRAINEEID on it, the report filters by the employees at that employer and its branches
-
If the user is an assessor and the report includes a table with ASSESSORID on it, the report filters by the assessors below them in the team hierarchy
After creating a new report and clicking save, the user filter will only be applied after returning to the reports list and re-opening the report.
Resource Availability - New Parameter
A new parameter has been added to the Resource Availability report - Hide course periods outside of course stream date range.
When set to Yes, the report will only display periods which take place within the course stream's start and end dates. Any periods that are booked outside of the stream's date range will not be displayed.
When set to No, the report will display all periods for a course stream, regardless of whether they are within the stream's date range. This is how the report previously worked.