Maytas Hub Release Notes
Technical specification
The latest Maytas and Maytas Hub technical specification can be found here.
Maytas Hub Release Notes – Version 5.28.9020.1
Learner Wellbeing
The Learner Wellbeing module provides a simple tool for learners to record feedback on their mood whenever they feel it is appropriate, along with monitoring tools for assessors and managers to help provide learners with additional support as required.
Additionally, a notification tool can be configured to inform users of all types when they have been active in Hub for a specified amount of time, so that they can be reminded to take a break if needed.
Permissions
The Wellbeing widget is displayed by default for learners. To disable it for a learner or group:
-
Go to Web User Editor on the sidebar.
-
Search for and open the user or group that requires permission.
-
Expand the Dashboard Widgets section.
-
Locate the Learner Wellbeing permission and select Always Off.
-
Click Save.
Learner Dashboard
The wellbeing widget is included on the learner dashboard by default.

When a learner selects a mood, this is acknowledged with a message.
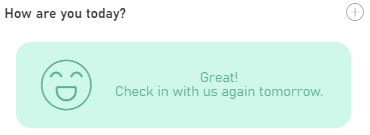
If a learner wishes to add more than one mood for the same day, they can click the  button at the top-right of the widget and choose again (this adds an additional mood entry, rather than replacing the previous one).
For the two lowest moods, the learner will be asked if they need to talk to someone. Clicking the link will open a new message with their assessor selected as the recipient by default.

The message displayed for the two lowest moods can be configured - see below for details.
Assessor Dashboard
The wellbeing widget can be viewed for an assessor's personal caseload or for the whole team, by toggling the Team Dashboard button at the top of the home screen.
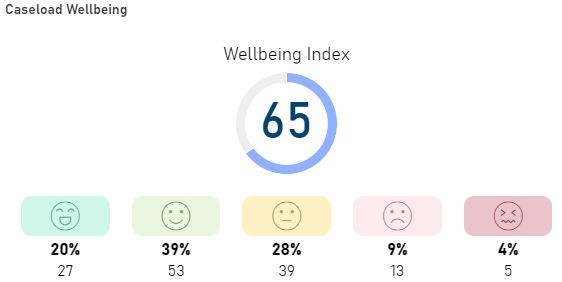
Each mood shows the percentage share and the number of learners who have selected it as their most recent mood. These are collated into the Wellbeing Index, which provides an overall percentage figure for the mood of the caseload(s).
The index is calculated as follows:
-
Each mood is assigned a value: great = 100, good = 75, okay = 50, bad = 25 and terrible = 0.
-
The number of learners for each mood is multiplied by the mood value, then those values are added together. Using the example above, this would be:
(27 x 100) + (53 x 75) + (39 x 50) + (13 x 25) + (5 x 0) = 8950
-
This is divided by the total number of statuses (e.g. 27 + 53 + 39 + 13 + 5 = 137) and then rounded to the nearest whole number. For the above example this would be 8950 / 137 = 65.33, rounded to 65.
-
The full Wellbeing Index calculation for the example is:
( (27 x 100) + (53 x 75) + (39 x 50) + (13 x 25) + (5 x 0) ) / (27 + 53 + 39 + 13 + 5) = 65
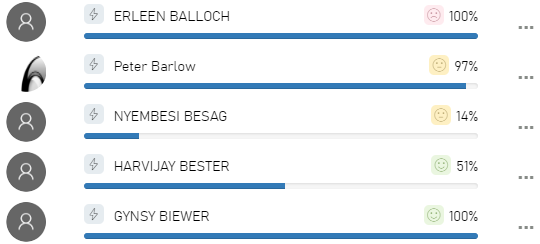
The latest submitted mood for each learner is also visible on the My Learners widget on the assessor dashboard.
Configurable Mood Messages and Break Notifications
When a learner selects a negative mood, the message that is displayed to them can be configured. Additionally, settings can be enabled which will notify users (not only learners) when they have been active in Hub for a specified amount of time and encourage them to take a break.
To set the configuration options:
- In Maytas Hub, go to Settings on the sidebar.
- Click the System configuration button.
- Go to Admin on the left (under the Maytas Hub Online header).
- Locate the Wellbeing section on the right.
- There are three config options. Tick the box for each option you wish to use:
Set a custom Learner Wellbeing message - Enter the text you wish to display when a negative mood is selected (note that the text Do you need to talk to someone? will always appear). If the config is disabled, the default text of Your mental health is important will be displayed.
Wellbeing notification body - Enter the text you wish to display when users are notified that they have been using Hub for a specified amount of time. The {TIME} parameter can be used to display the time a user has been active (e.g. You have been using Hub for {TIME} - consider taking a break).
Wellbeing notification trigger time - Enter the time in minutes after which users should be notified how long they have been using Hub.
- Click Save.
If the custom learner wellbeing message is set, learners will see the custom message when they select a negative mood.

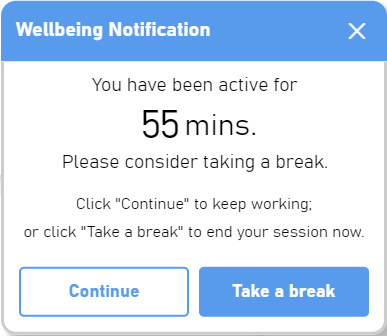
If the wellbeing notification options have been set, users will be notified when they have been active in Hub for the specified time. If the user clicks the Continue button, the timer will reset and another notification will be displayed after the specified time interval has elapsed again, showing the total time the user has been active. Clicking Take a break will log the user out.
Learner Wellbeing Report
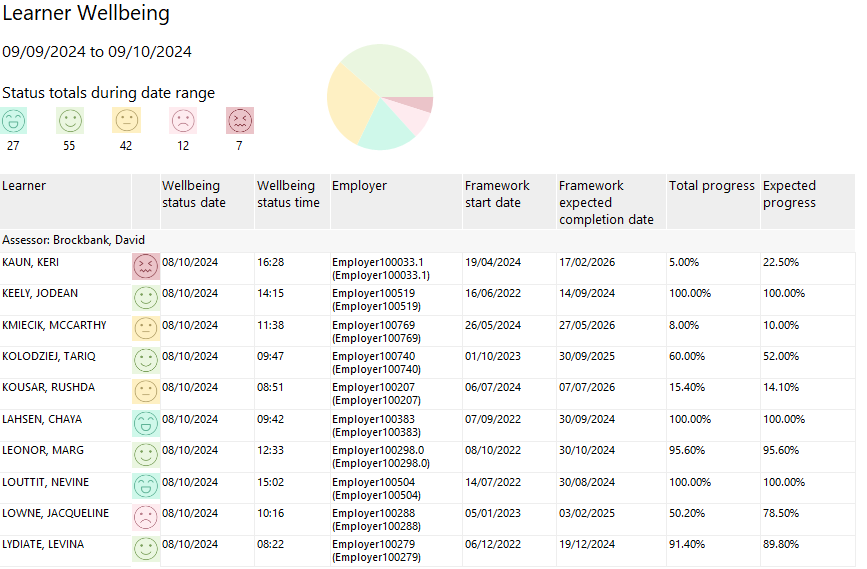
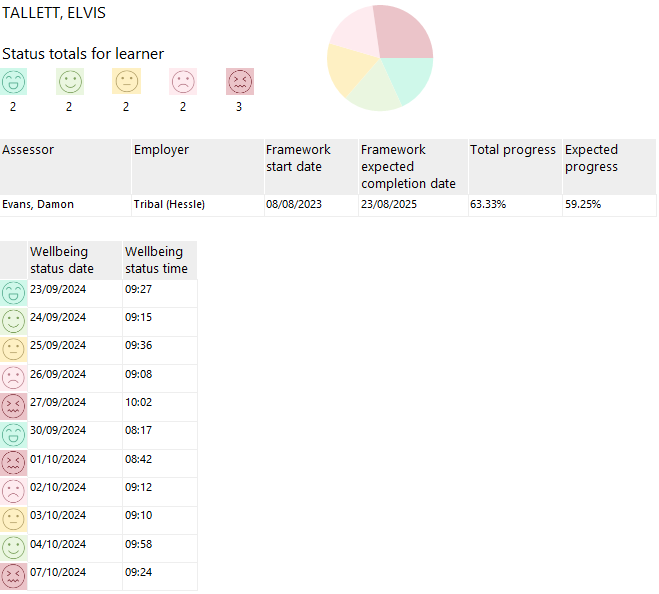
The Learner Wellbeing Report shows a summary of moods selected by learners in your caseload and your team's caseloads (if applicable) across a date range. The report also shows a list of each learner (grouped by their assessor) and their latest selected mood, and clicking a learner displays a history of all their selected moods.
The report can be accessed in Hub by going to Reports on the sidebar and selecting the Learner Wellbeing report from the dropdown list.
Parameters
-
Start / End date - The report filters by learners whose latest wellbeing status date is within this date range.
-
Assessor types - The learner-to-assessor link types to use to determine a learner's assessor.
-
Employment types - The learner-to-employer link types to user, which determines which employer (if any) shows in the Employer column.
-
Wellbeing status - Filters by the selected statuses.
-
Group by assessor - When set to Yes (the default), learners will be grouped by their assessor. When set to No, the report will list all learners from the relevant caseload(s) in a single group.
Layout
The top of the report shows a summary of the data in the date range, comprised of the number of learners for each mood (based on the learner's most recent selection in the date range) and a pie chart that shows the proportions of each mood.
The table beneath the summary lists each learner who has submitted a mood in the date range, showing their most recently submitted mood in the date range. Note that if a learner has submitted a different mood after the end of the selected date range, the most recent mood from within the date range will be shown instead.
Each row in the table also shows the date and time the mood was submitted, along with the learner's employer and an overview of key dates and progression for their framework. If a learner has multiple frameworks, their most recent one is shown.
Clicking on a learner will open a drilldown report that shows a history of the learner's submitted moods (this is not limited to the date range).
Module Register Time and Notes
The section on Module Registers begins at 2 min 51s.
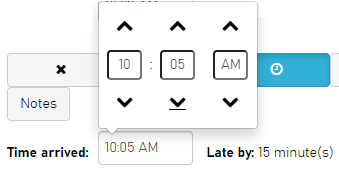
When entering registers, notes can now be added against a learner's register entry. Additionally, if a learner is marked as late, their time of arrival can also be entered.
-
Go to Registers on the sidebar.
-
Search for and open the register you wish to complete.
-
When a learner is marked as late, an option to enter the time of arrival will appear.

-
Click the time to enter the time of arrival. This will automatically calculate how long the learner is late by.
-
If you wish to add a note to the entry, click the Notes button and enter text in the box that appears.

-
Complete the register as required and click Save.
Message Read Tracking
Users can now see when messages they have sent have been read by the recipient(s). This can be viewed in the messages Sent folder.

The Read column at the end of each row indicates whether or not a message has been read, using the following statuses:
No icon - Indicates that the message has not been read by any of the recipients.
 Indicates that some recipients have read the message and others have not. Hovering over the icon will display the recipients who have read the message.
 Indicates that all recipients have read the message.
 Indicates that the message requires a response and the deadline has been passed without all recipients responding.
The blue and green ticks also show within the relevant messages when opened. When messages with overdue responses are opened, a list of users still to reply is displayed at the top of the message.

Active Workflows Updates
The Active Workflows panel that appears for assessor users on a learner's summary screen has been updated so that completed workflows can be viewed and so that visit workflows are included.
To show completed workflows, click the Show Complete toggle button at the top-right of the panel.

If a workflow has been invoked against a learner more than once, the most recent invocation will be displayed.
Drag and Drop Evidence Files
Learner users now have the option to drag and drop files into the evidence wizard as well as being able to browse to and select files (as was previously possible).
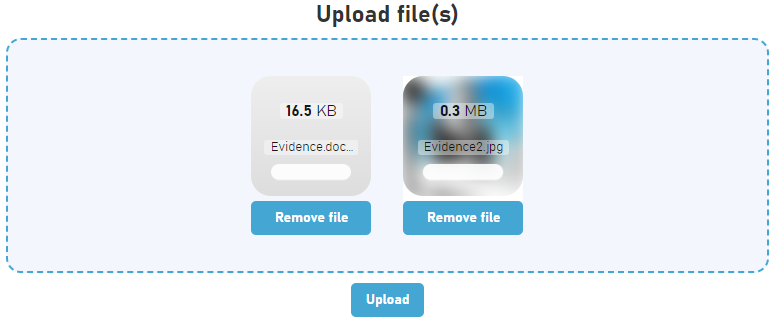
When a learner clicks the button to submit evidence, they will now see a drag and drop area:
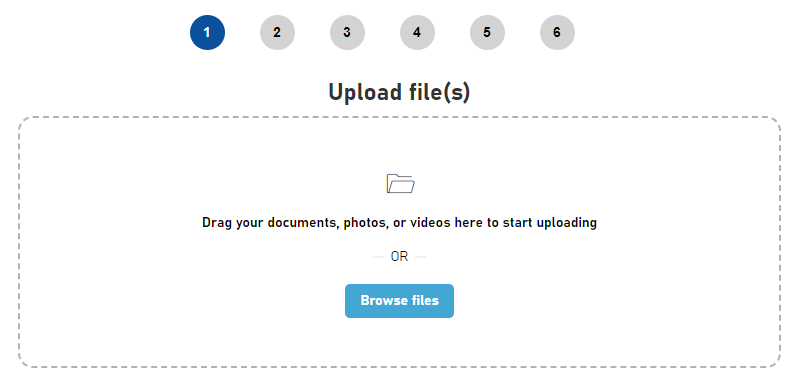
When one or more files are dragged into the area, they will be listed in the area displaying their file sizes.
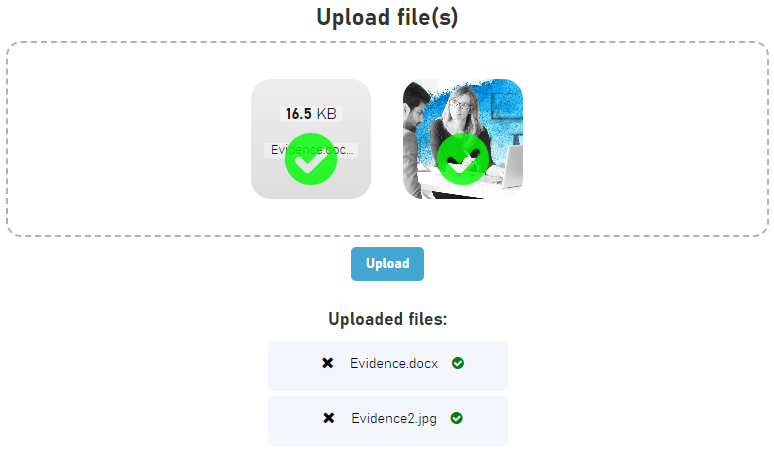
Once all required files have been dragged into the area, click the Upload button. The learner will see confirmation that the files uploaded successfully.
Assessor Dashboard - Jump To Screens Menu for Learners
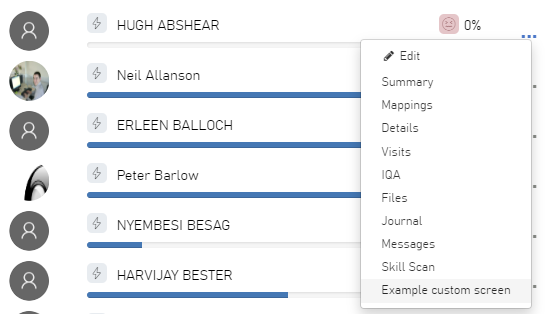
The My Learners widget on the assessor dashboard now includes a jump-to menu to quickly access a learner's screens. The menu can be accessed by clicking the three dots at the end of a learner's row:
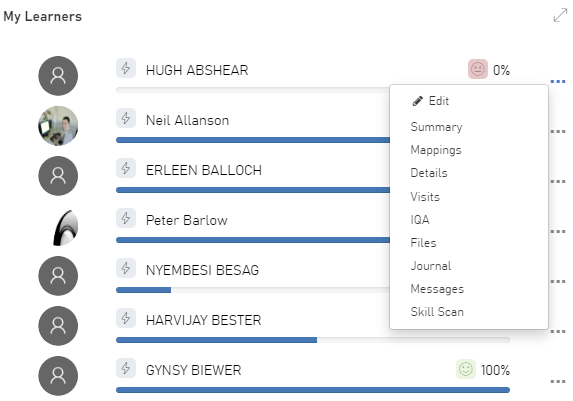
Most of the options jump to the relevant screen on the learner's record, whereas the Edit option lets you edit a learner's personal, contact and programme details.
Configuring the menu
The standard screens which appear on the menu can be configured. The menu can also be removed entirely:
- In Maytas Hub, go to Settings on the sidebar.
- Click the System configuration button.
- Go to Admin on the left (under the Maytas Hub Online header).
- Locate the General section on the right.
- Locate the permission Standard trainee tabs available on the Jump To menu.
- To remove the menu, untick the checkbox for the permission.
- To configure the screens available on the menu, ensure the checkbox for the permission is ticked, then select the required screens from the list.
- Click Save.
Custom screens on menu
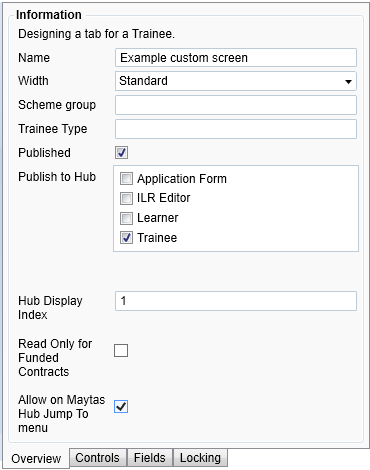
Custom screens can also be included on the menu by enabling an option in the Screen Designer:
-
In Maytas 5, go to Tools on the toolbar and click New / Load on the Screens panel of the ribbon.
-
Open the screen that you wish to enable on the menu (this guide will assume that the screen is already configured to appear in Hub).
-
On the left side, tick the Allow on Maytas Hub Jump To menu checkbox.
-
Click Apply.
-
Go to Home on the toolbar and click the Sync button.
The custom screen will now appear as an option on the menu in Hub:
Assessor Dashboard - Quick Actions Menu for Learners
The My Learners widget on the assessor dashboard now includes a menu of quick actions to perform a variety of tasks for a learner, such as invoking a workflow or creating a visit. This is accessed via the lightning bolt to the left of a learner's name:
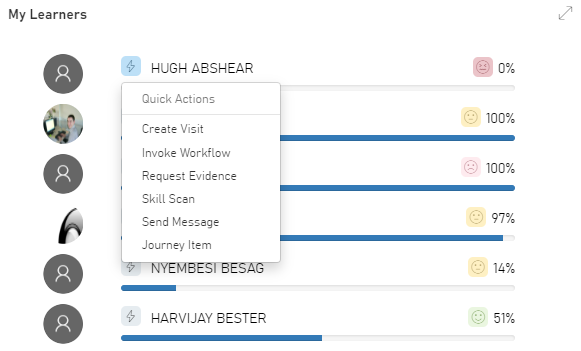
The available items in the list is determined by the assessor's permissions. For example, if the assessor has the permission to invoke workflows, the Invoke Workflow option will appear in the list. Certain permissions may also restrict some actions on a learner-by-learner basis.
Quick actions are best suited for when a basic task needs completing swiftly, without the need to open a learner's record and go through a full process. When an option is selected from the menu, a pop-up screen will appear with only the basic required fields, so that the action can be completed ASAP.
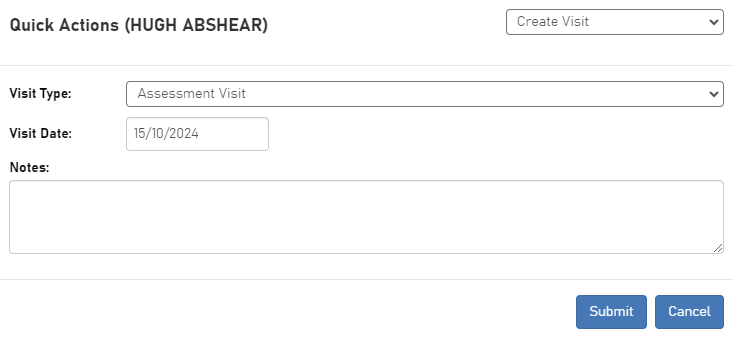
Create Visit
Select the visit type and date, enter any notes required, then click Submit.
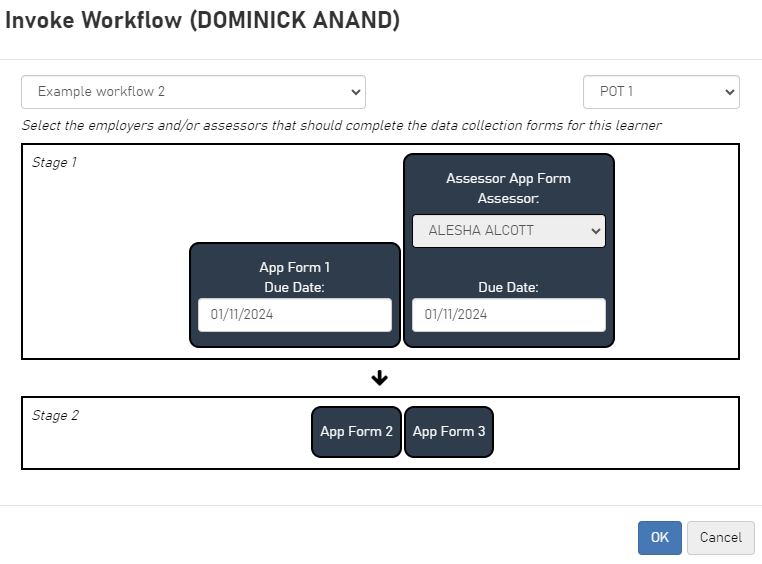
Invoke Workflow
Select the required workflow from the dropdown box. The workflow stages and POT selection box will then appear. Complete the details as needed and click OK.
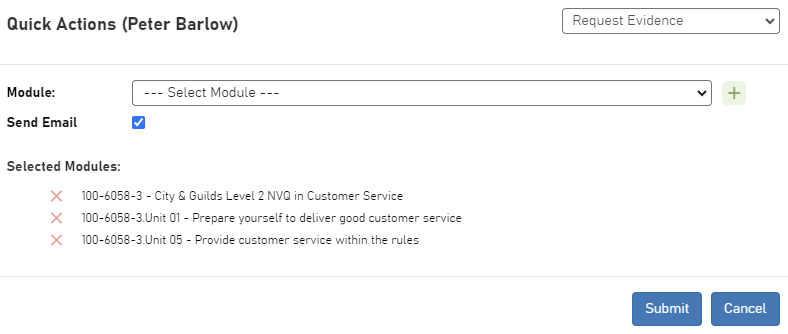
Request Evidence
Select the module you wish to request evidence for from the learner, then click the  button to the right of the dropdown box to add it to the request list. Repeat as needed for additional modules.
If you wish to notify the learner via email, tick the Send Email box. Click Submit when ready.
Skill Scan
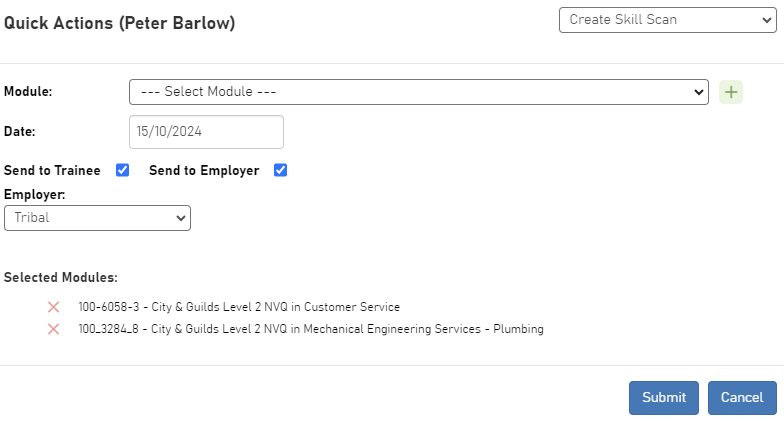
Select the module you wish to create a skill scan for, then click the  button to the right of the dropdown box to add it to the list of skill scans to create. Repeat as needed for additional modules.
The skill scans can be assigned for completion by learners and employers by ticking the Send to Trainee and Send to Employer checkboxes as required. If the skill scans are assigned to an employer and the learner has multiple employers associated with them, the employer can be selected from a dropdown box.
Click Submit when ready.
Send Message
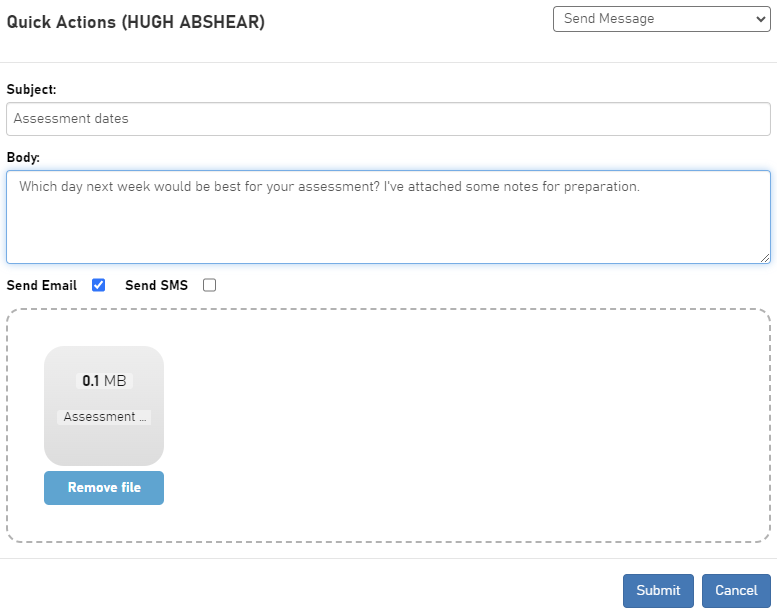
Enter the subject and body for the message. If you wish to send the message by email or SMS as well as by the Hub messaging system, tick the Send Email and Send SMS checkboxes as required.
If you wish to attach any files, drag them onto the file upload area.
Click Submit when ready.
Journey Item
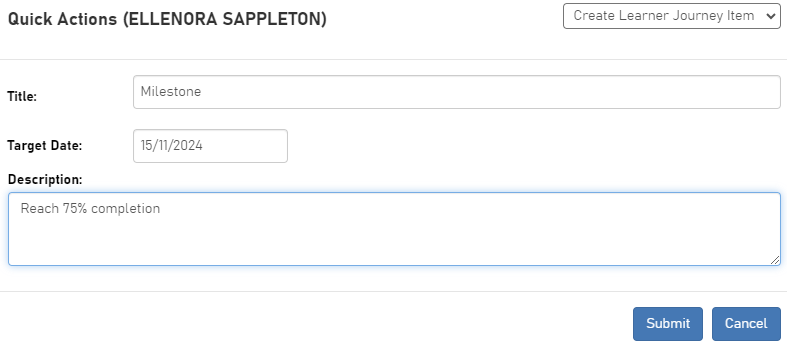
Enter the title, target date and description for the journey item, then click Submit.
Learner Progress Widget - Expected Progress
The Progress widget for learner users can now show a learner's expected progress. This must first be enabled via a configuration option:
- In Maytas Hub, go to Settings on the sidebar.
- Click the System configuration button.
- Go to Learner Login on the left (under the Maytas Hub Online header).
- Locate the General section on the right.
- Tick the box for the Learner Progress Widget - Show Expected Progress permission and ensure the toggle button is set to ON.
- Click Save.
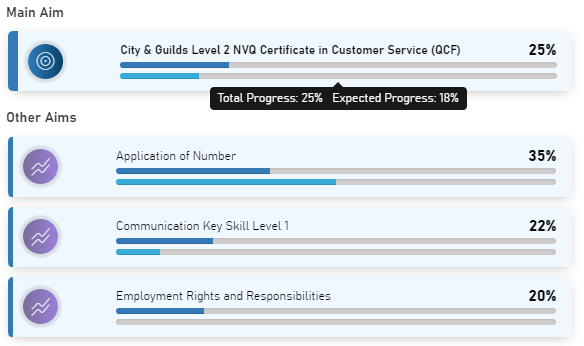
The Progress widget will now display two progress bars for each aim, with the top bar showing total progress and the bottom bar showing expected progress. Hovering the mouse over the bars will display the percentages.
Off-the-Job Training Entries via Learner Evidence Wizard
The evidence wizard for learner users can now include a step that allows learners to add an OTJ entry. This must first be enabled via a configuration option:
- In Maytas Hub, go to Settings on the sidebar.
- Click the System configuration button.
- Go to Learner Login on the left (under the Maytas Hub Online header).
- Locate the Evidence Wizard section on the right.
- Tick the box for the Allow OTJ Entry from the Evidence Wizard permission and ensure the toggle button is set to ON.
- Click Save.
When a learner submits evidence via the Evidence Wizard, they will now see an extra step (after the Showcase step) which asks if they would like to associate an OTJ entry with the evidence.

Clicking No will proceed to the next step. Clicking Yes will display the OTJ entry form to complete.
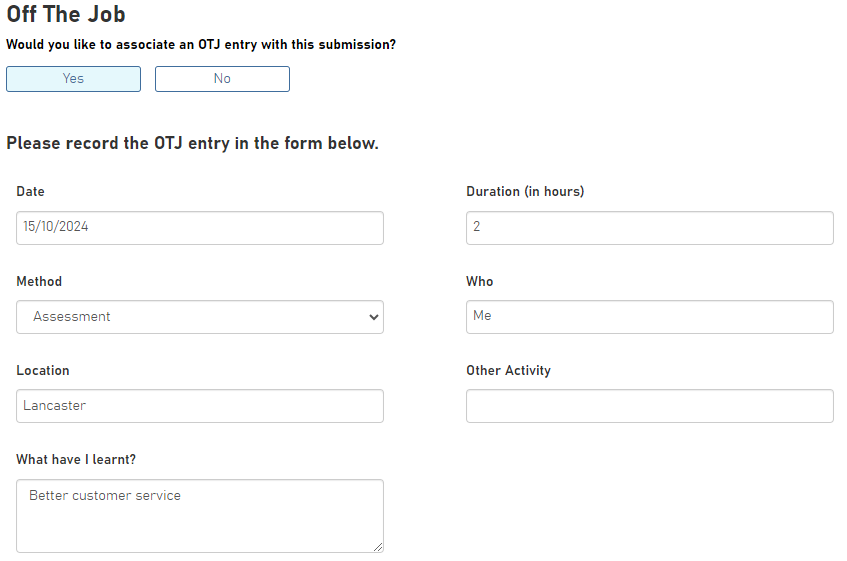
Click Next to proceed to the next step.
HTML in Skill Scan Narrative Text
The narrative text displayed at the top of Skill Scans can now incorporate HTML to provide a wider array of options and formatting. This is handled via the two configuration options which relate to it (one for learner Skill Scans and one for employer Skill Scans):
-
In Maytas Hub, go to Settings on the sidebar.
-
Click the System configuration button.
-
For the learner narrative text, go to Learner Login on the left and locate the option Set the narrative text for learners filling out a Skill Scan on the right (in the Skill Scan section).
For the employer narrative text, go to Employer Login on the left and locate the option Set the narrative text for employers filling out a Skill Scan on the right (in the General section).
-
Edit the narrative text using HTML as required.

-
Click Save.
Skill Scans will now display the text at the top, interpreting the HTML where applicable.
