5.28 Maytas ESFA Release Notes
Note regarding submissions
We would like to remind providers to create a submission early and check for any errors using reports from the FIS. After submission to the ESFA, providers should check that data has submitted correctly using the available reports. Providers should check that all their expected starts and completions are submitted correctly, and that start and outcome payments correctly match the PFR.
Our support desk gets extremely busy in the days prior to the submission deadlines, and although we try and prioritise submission-related queries, we cannot guarantee assistance if queries are sent late. If you do encounter any issues, please ensure that you contact Maytas Support as soon as possible, as we can only rectify issues of which we are aware. We also recommend checking Maytas Communities regularly for information on any known issues and solutions. Tribal cannot be held responsible for any issues caused by your failure to comply with this advice.
Technical specification
The latest Maytas and Maytas Hub technical specification can be found here.
Once the upgrade has been completed, the version number should be checked to ensure it has been successful.
- Start Maytas and go to Support on the toolbar.
- Click About.
- The version numbers should read 5.28.9010.1. If you have any other version, please ensure you have followed the upgrade instructions correctly. If you require assistance, please contact Maytas Support.
It is the responsibility of customers to ensure that users carry out any required user acceptance testing and sign off on the upgrade.
Data migration
Please note that it is important to ensure that all 2023/24 learners have been entered before the upgrades are applied. This is because the upgrade migrates 2023 data to the 2024 fields, and any 2023 learners entered after the upgrades will not be migrated. As such, if any 2023 learners do need to be entered after the upgrade, both the 2023 and 2024 tabs must be completed to ensure all data is present and correct.
Complete the Upgrade
Check the Contractor Details for the ESFA Export
- Open Maytas 5 and select Management | Contracts.
- Highlight the contractor name (company) you wish to edit.
-
Right-click and select Edit.
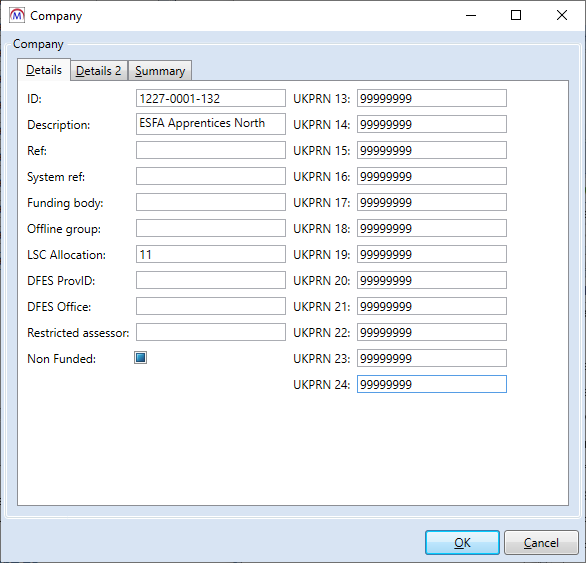
- The Company screen will be displayed. The technical upgrade will have copied the UKPRN field to the new 24 box. If necessary, you should amend this value.
- Providers need to ensure that these instructions are completed for each company (contractor) used for the ESFA export.
Create the 2024/25 ESFA Formula-Funded Contract
A 2024/25 ESFA formula-funded contract should be set up for each ESFA contractor. Without this contract, Maytas is unable to determine the funding rules, schemes and lookup codes to use.
- In the Contracts module, left-click the contractor (company) to which you wish to add the new contract.
- Click Add Contract on the ribbon.
-
Make sure that option 1. Existing company is selected then click Next.
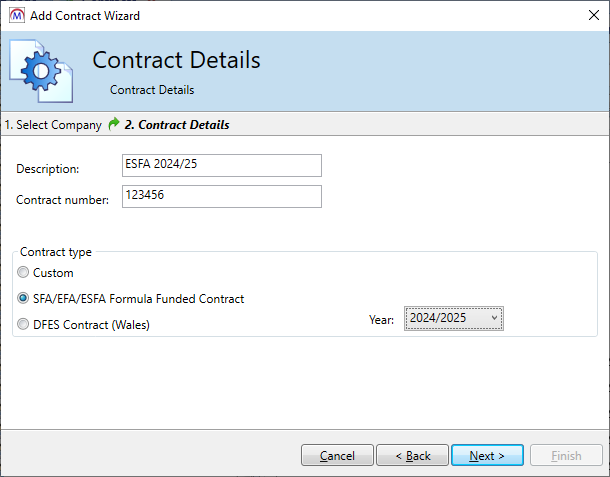
- Enter a contact description (e.g. ESFA 2024/25).
- Enter a contract number if required.
- Select the SFA/EFA/ESFA Formula Funded Contract option.
- Select year 2024/2025.
- Click Next.
- Amend the schemes you wish to include in the contract and click Next.
- Click Finish.
Features Added in the Upgrade
These are the main updates in the upgrade:
- ILR tabs for 2024/25
- ILR reports for 2024/25
- ILR rollover validation rules for 2024/25
- ILR rollover funding for 2024/25 using 2023/24 rules
- ILR batch export
- Lookup changes for new and revised fields
- Reports Library 1.0.4.8
- Fixes to a number of issues
Import Funding Information
The process for importing the required funding information into Maytas is as follows:
- The latest LARS should be imported.
- The latest postcode data should be imported.
- Once all data has been imported, ensure that the funding cache is refreshed (either on a database schedule or a manual update out of working hours).
Import LARS
The LARS should be imported as follows:
- Download the latest LARS MDB file. This is currently version 10.
- In Maytas, go to Exports on the toolbar.
- On the ILR Tools panel of the ribbon, go to Uploads | Upload Funding Information | Upload LARS (Version 10).
- Browse to and select the downloaded LARS file and click Open.
- The file will now be imported. Click OK on the message which appears.
Progress on the import can be checked by going to Home | Server Tasks | Server Jobs. Typically it will take several minutes.
Import Postcode File
- Obtain the postcode uplift factors file - Download the zip file under 2024 to 2025 uplift factors by postcode and LLSOA: CSV files. Note that this file has not been made available at the time of writing but is expected shortly.
- In Maytas, go to Exports on the toolbar.
- On the ILR Tools panel of the ribbon, go to Uploads | Upload Postcodes| Upload Post Code Data (2024/25).
- Browse to and select the postcode uplifts zip file and click Open.
- The file will now be imported. Click OK on the message which appears.
Progress on the import can be checked by going to Home | Server Tasks | Server Jobs. Typically this will take several minutes.
Note on the Funding Cache
By default, the funding cache will update overnight so that funding information in Maytas uses the newly-imported FIS and postcode information. Please check with your system administrator if you are unsure if or when the funding cache is updated on your system. You can also manually set the funding cache to update by going to Management | Profiles and clicking the Funding Cache button, though please be aware that this may take a long time and may use a large amount of system resources, which could affect performance for other users on the system.
Maytas 5 Version 5.28.9010.1 Release Notes
2024/25 Contract Year Updates
New Contract Year Tabs
New Maytas tabs for 2024/25 have been produced for the ILR and LLWR as per specifications from the Data Service and DfE. These will have been imported automatically in the upgrade. Please note that while both ILR and LLWR tabs are imported, the relevant tabs will only show for the relevant learners – i.e. ILR tabs will only show to learners on English schemes and LLWR tabs will only show to learners on Welsh schemes. Details of the tabs can be found below.
Please note that user permissions will need to be set for the new tabs, as by default they are available to all users. Also please note that if you have changed the field type for any ILR fields (e.g. to or from a lookup), these will need to be changed from the default field type in the screen designer.
ILR Changes for 2024/25
These are the main ILR changes for 2024/25 which have been implemented in Maytas:
New Tabs for 2024/25
There are six new ILR tabs for 2024/25:
- ILR 2024 App (starter and leaver info) – These are intended for learners on Apprenticeships.
- ILR 2024 16-19 (starter and leaver info) – These are intended for 16-19 learners that are not apprenticeships.
- ILR 2024 Other (starter and leaver info) – These are intended to be used for all learners who are not on Apprenticeship or 16-19 schemes.
As in previous years, the tabs have been designed so that only the appropriate tabs appear for each scheme. However, we are aware that many providers have bespoke or non-standard scheme groups. In these cases, it is possible that the tabs may not appear on certain schemes. This can be rectified in the following way:
- Check the group type of the scheme (SCHEME.GROUPTYPE).
- In Maytas 5, go to Tools on the toolbar and click New / Load on the Screens panel.
- Select Trainee on the left.
- Double-click the ILR tab which is not appearing. The tabs for 2024/25 are:
- ILR 2024 App Starter Info
- ILR 2024 App Leaver Info
- ILR 2024 16-19 Starter Info
- ILR 2024 16-19 Leaver Info
- ILR 2024 Other Starter Info
- ILR 2024 Other Leaver Info
-
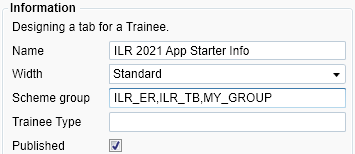
Alter the Scheme group as required. Each group should be separated with a comma (no spaces). For example, if the App tab is not showing for scheme 3, and the group type for scheme 3 is called MY_GROUP, the tab should be set as in the screenshot.
- Click Apply to save the changes.
- Go to Home on the toolbar and click the Sync button.
New fields
The Tailored learning outcome area field has been added to the ILR 2024/25 Other Leaver tab, in the Main Learning Aim section. It is also included on the ILR 2024 Sub Aims tab, in the Learning End Information section.
Removed fields
The Employment outcome field has been removed from all aims on the ILR 2024 App Leaver Info and ILR 2024 Other Leaver Info tabs.
The Destinations entity has been removed from ILR collections from 2024/25, but the Destinations grid has been left on the ILR tabs so that the data can continue to be recorded and used internally.
Notes on Continuing Learners and Migration
As part of the upgrade, data for continuing learners is migrated from the 2023/24 fields to the 2024/25 fields. Any changes to continuing learners and any late-notified learners entered after the upgrade should be completed on both the 2023/24 and 2024/25 tabs. This is because certain ILR fields are recorded in different fields in the database from year to year, and therefore it is important to ensure that all data is completed and correct on both tabs.
The following fields are NOT migrated from 2023/24 to 2024/25:
- Learner reference number in previous year
- UKPRN in previous year
- Accommodation
- Learning support cost
- Planned learning hours
- Planned EEP hours
- GCSE maths qualification grade
- GCSE English qualification grade
- High needs students
- Learner support reason
- Special educational needs
- Eligibility for 16-19 (excluding Apprenticeships) disadvantage funding
- GCSE maths condition of funding
- GCSE English condition of funding
- Free meals eligibility
- Financial support type (HE)
- Financial support amount (HE)
It is important to ensure these fields are completed on the 2024/25 tabs where required.
Additionally, framework codes and pathway codes for TLevels are no longer migrated, nor are programme type 24 (traineeships) aims.
ILR Reports for 2024/25
The ILR reports have been created using the available ILR guidance for 2024/25. Providers should check with the ESFA that they are happy for the current reports to be used and that it is compliant for audit purposes. As this has been the case for the reports in previous years, we do not expect any issues in this regard.
There are reports available for apprenticeship, 16-19 (excluding apprenticeships) and non-16-19 learners.
The ILR reports are automatically imported in the upgrade and can be found in the ILR folder of the Reports Library.
There are two ways to run the reports:
- On the Home tab, select Report Library | ILR and select the required report. This will let you search for a learner and choose whether to show codes or descriptions for the fields. It will also let you select the sections to show.
- In a learner record, click Process and select the appropriate ILR 2024/25 process. This will open a PDF export of the report for the learner / POT. It will use the default of showing code values.
ILR Export 2024/25
The ILR export for 2024/25 is now available in Maytas. To view the ILR export screen for 2024/25:
- Click Exports on the toolbar.
- Click ILR Export on the ribbon.
-
Click the
 button.
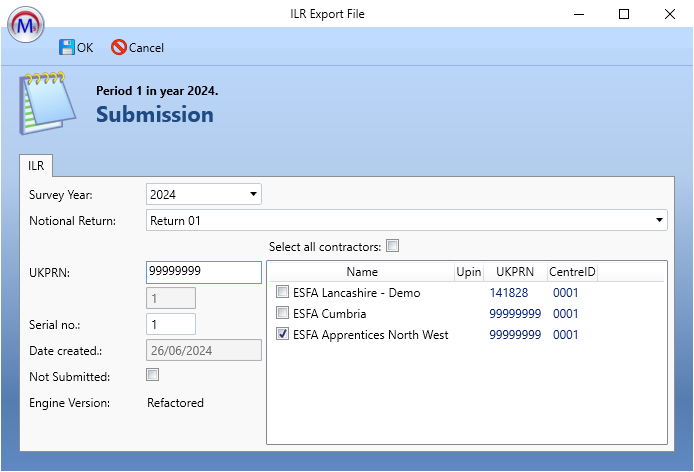
- Choose 2024 from the Survey Year dropdown box.
- Choose the Notional Return period.
- Amend the UKPRN as required.
- Choose the required contractors, or tick Select all contractors.
-
Once ready, click OK.
-
Locate the submission by expanding the contract year and period using the arrows to the left. Click the submission to select it. The status will say Generate pending until the export data has been generated. It will then say File preparation finished. Please note that this may take a while, depending on the amount of data being exported.

- Edit opens the export and allows you to view and edit the export settings. Please note that not all settings can be changed once an export has been created.
- Generate processes the export and produces a text file showing any errors for each learner. This allows you to correct any errors and re-generate before the batch file is created. The generation progress is shown with the circular progress bar to the right.
- View Log shows any errors in the export. These should be investigated and resolved and the data re-generated before outputting the XML.
- Output XML creates the actual batch file. The file will be created at C:\Temp on the Maytas server.
- Get File lets you download the batch file once it has been created.
The 2024/25 ILR export has been tested and validated against the latest version of the online ILR specification as of the time of this release, as well as other accompanying documents. The 2024/25 FIS is still in a beta stage at the time of writing, and while to the best of our knowledge the funding model 38 funding calculations have been correctly implemented as per the ESFA specification, we have not yet been able to verify FM38 learners against the FIS. Further testing will be done as new versions of the FIS become available.
While we have tested the ILR export to the best of our ability with the available specifications, there may be further issues which have not yet been identified. It is also possible that future versions of the FIS and the ILR specification may require the export and/or FIS import to be changed to meet any new criteria. Any changes that are required will be implemented in a follow-up release of Maytas.
Migration of ILR export override flags
The following details whether ILR export flags are migrated from 2023/24 to 2024/25. For information on setting these flags, please contact Maytas support.
Force Export Flag
The 2023/24 force export flag is not copied to the 2024/25 force export flag. To override the ILR export and include a POT that does not meet the 2024/25 ILR export criteria, the 2024/25 export flag must be set.
Blocking Flags
The 2023/24 blocking flags are copied to the 2024/25 blocking flags. Aims blocked from the 2023/24 export will continue to be blocked in the 2024/25 export.
Funding Information
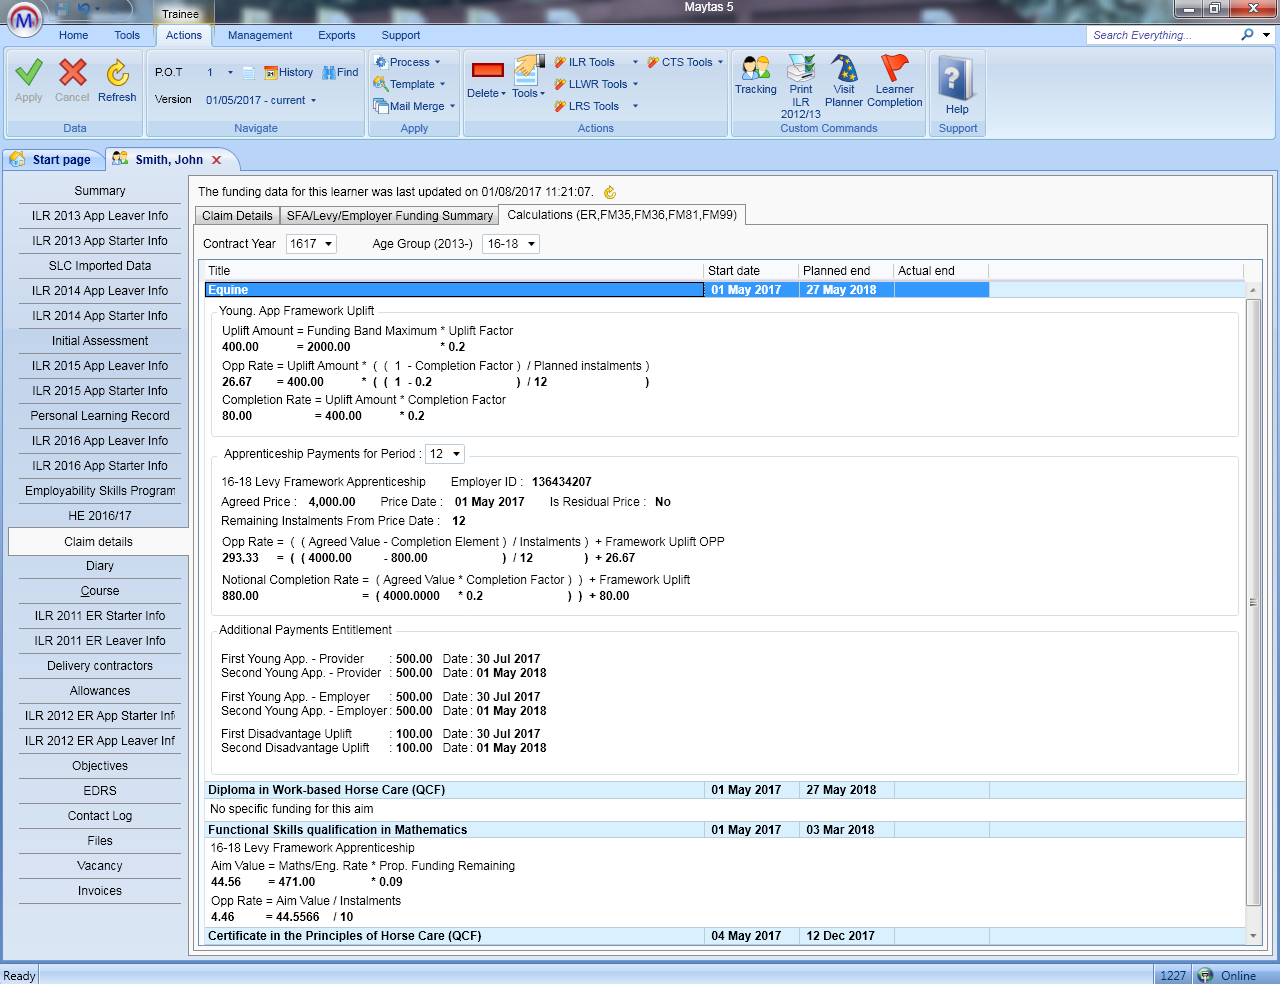
The funding information for 2024/25 in this upgrade is based on the funding rules for 2023/24, since full specifications were not available at the time of development. The 2024/25 funding information in this upgrade should be considered a beta version and is subject to change once future specifications have been published.
Completion Status and Outcome
Updated versions of the ILR 2023/24 tabs are included with this release which use new fields for outcome and completion status. These are referred to as the R14 fields. Data from the existing fields are migrated to them during the upgrade, and in most cases these values do not need to be altered. The R14 fields are what will be used for the 2023/24 ILR export and the existing fields will continue to be used from 2024/25 onwards.
The purpose of this change is to allow different values for 23/24 and 24/25 to be recorded, so that learners who completed in 23/24 who were on a break in learning or had an unknown outcome can be correctly included by the 24/25 ILR export. As with any other continuing learner, you should ensure that data is correct on the tabs for each contract year.
For late-notified leavers where the learner left in 23/24 but the data is entered during 24/25, it is important that you complete the above fields on both the 23/24 and 24/25 tabs, even though the learner has not continued into 24/25. This is to ensure the data is recorded in the existing / ongoing fields so that the correct data for these learners is included on reports.
TRAINEEPOT3 Table
A new table, TRAINEEPOT3, has been added to the database. This table is intended to be used for custom, user-added fields for POT-specific data.
New fields can be added to TRAINEEPOT3 using the Schema Editor (see here for instructions) and selecting TRAINEEPOT3 as the table name.
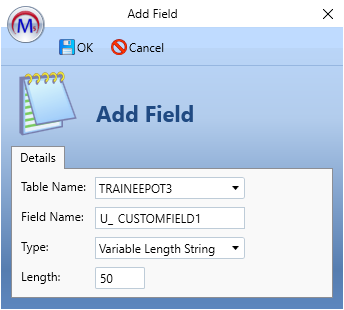
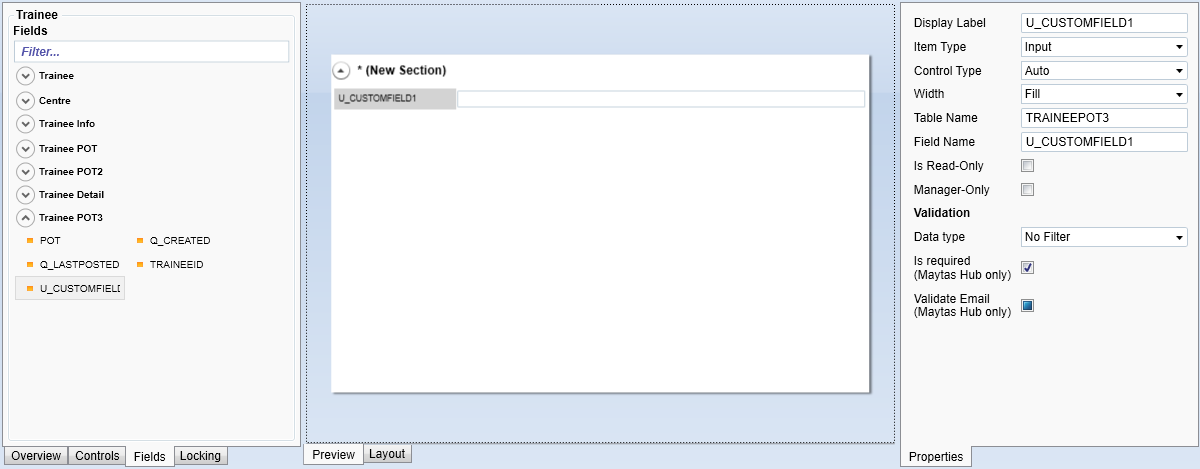
After performing a sync, the field will then be available across the system (e.g. in Report Generator, the Screen Designer, etc).
BKSB User Creation
Learners in Maytas can now be used to create a corresponding BKSB user. This requires the BKSB Integration module.
-
Open the learner record you wish to create a BKSB user for.
-
On the ribbon, select BKSB | Create user.
-
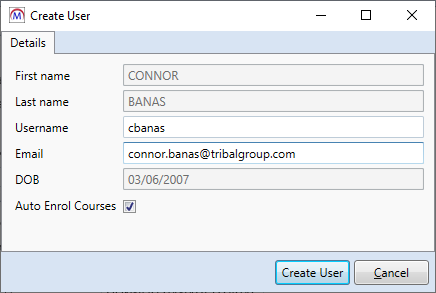
Review the data to be used to create the BKSB user. The username will default to the learner's web user account if they have one (or their BKSB username if they already have a user associated with them), but the username can be edited as required, as can the email address to use.
If the Auto Enrol Courses box is ticked, this will enrol the user on courses within BKSB.
-
Click Create User.
-
A confirmation message will appear when the user has been created in BKSB. Click OK.
DfE - New Fields
The fields funded place, cohort_changed_after_payments_frozen, induction end date and mentor funding end date are now included when downloading data from the DfE to Maytas.
Funded place is downloaded to the DFE_NPQ_APPLICATIONS table in Maytas, as well as the field TRAINEEPOT2.DFE_FUNDED_PLACE.
Cohort changed after payments frozen, induction end date and mentor funding end date are downloaded to the DFE_ECF_ENROLMENT table in Maytas, as well as the fields TRAINEEPOT2.DFE_COHORT_CHANGED_AFTER_PAYMENTS_FROZEN, TRAINEEPOT2.DFE_INDUCTION_ENDDATE and TRAINEEPOT2.DFE_MENTOR_FUNDING_END_DATE.
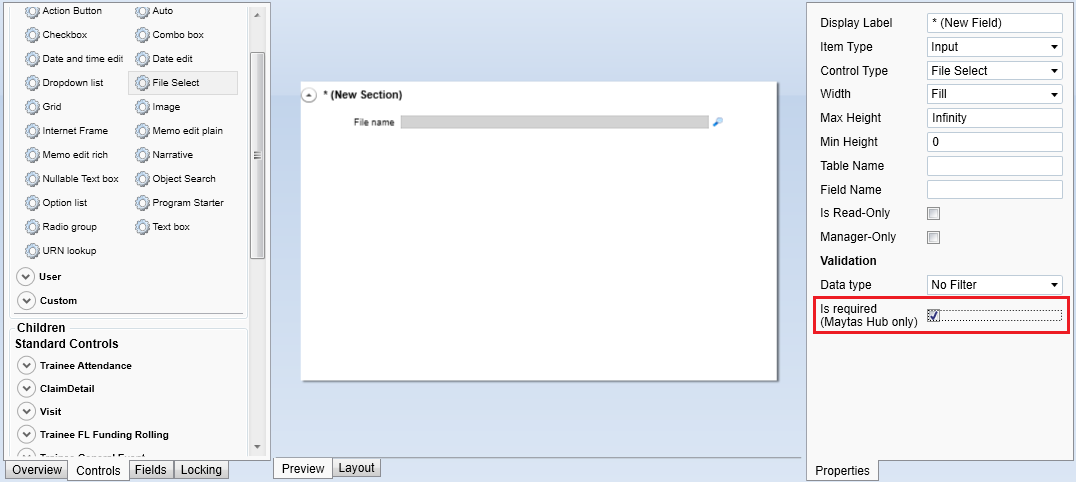
Mandatory Option for File Select Control
The File Select control in the screen designer can now be set to be mandatory on application forms so that a file must be uploaded to successfully submit the form:
-
Go to Tools on the toolbar and click New / Load on the Screens panel of the ribbon.
-
Open the app form screen that you wish to edit.
-
Select the Controls tab at the bottom-left.
-
Drag a File Select control onto the design area (or select an existing File Select control on the screen).
-
Click the File Select control in the design area.
-
In the properties on the right, tick the Is required (Maytas Hub only) checkbox.
-
Click Apply.
-
Go to Home on the toolbar and click the Sync button.
Workflows - Latest Assessor / Employer of Specific Type
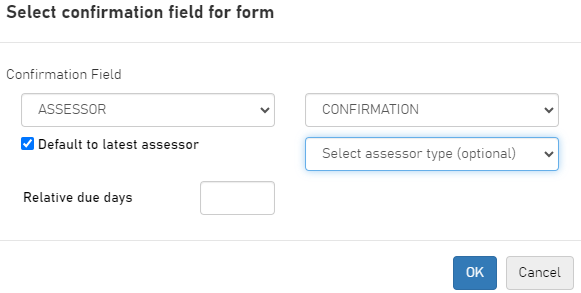
When invoking workflows that use the Default to latest assessor / employer option, you can now also choose to specify the assessor or employer type.
For example, if a learner has two active assessor records associated with them - an Assessor and a Tutor - selecting the type will tell the workflow whether to use the Assessor record or the Tutor record. If the type is not specified, the record with the most recent start date will be selected.
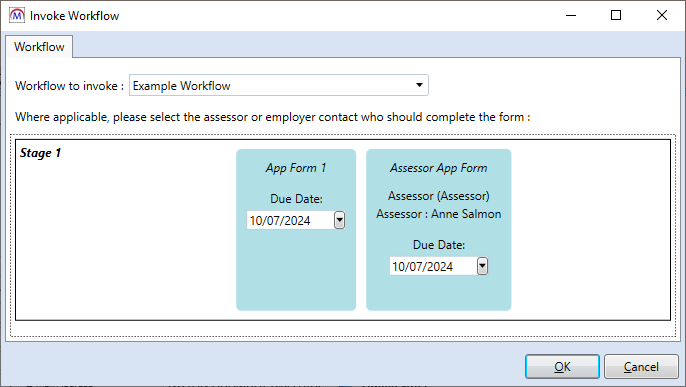
When the workflow is invoked in Maytas 5, the type that has been used is displayed in parentheses next to the assessor or employer.
Reports Library 1.0.4.8
Upgrade the Reports Library
How to Upgrade the Reports Library
The Reports Library upgrade should be performed by an admin user, which will upgrade the reports for all users.
To enable to the Upgrade reports button for an admin user:
- Go to Tools | Edit Permissions.
- Select the user or group which requires permission.
- Go to the Commands tab.
- Expand the Support section.
- Set the Report SQL Upgrade permission to Visible.
- Click Apply and restart Maytas for the change to take effect.
For customers who manage their own systems on-premise, it is strongly advised to take a database backup before performing the upgrade. This is not necessary for hosted customers as backups are taken regularly.
To upgrade the Reports Library:
- Go to Support on the toolbar.
-
Click Upgrade reports.

- You will asked to confirm that you wish to perform the reports upgrade SQL. Click OK to continue.
- A message will appear saying that a task has been created. Click OK.
-
You can check that the upgrade was successful by going to Home on the toolbar and then selecting Server Tasks | View Jobs.

If the Status indicates that the upgrade has failed, please do not continue with importing the reports package and raise an incident on the Self Support Portal for assistance.
- Next, the reports package must be imported. Go to Home on the toolbar and click Import on the Reports panel on the ribbon.
- This will display the Report Import wizard. Click +Add Files.
- Browse to the Maytas 5\Extras\Reports Library folder of the upgrade, select one of the following packages and click Open:
- For all reports, select Reports Library 1.0.4.8 (all reports).
- For ESFA and general reports only, select Reports Library 1.0.4.8 (ESFA and general reports).m5rep.
- Click Finish to import the reports. This process may take a long time (potentially upwards of 30 minutes) depending on the size of the reports package.
-
When the reports have finished importing, click Finish.
The import log may display various warning messages, which are generally a result of report formatting and other factors which do not impact how a report runs (e.g. The text box ‘textbox3’ extends beyond the bottom edge of its container.). Unless a message indicates that the import has failed, these warnings can safely be ignored.
Updates for 2024/25
The reports library has been updated to use fields from 2024/25 where appropriate and to include the 2024/25 report year on certain parameters.
Apprenticeship Accountability Framework Report Specification Updates
The Apprenticeship Accountability Framework report has been updated to use the new thresholds introduced to the specification in April 2024.
The specification has subsequently been updated in June 2024 to include benchmarked QAR data. As the update was not published in time to be implemented in the 5.28 release, it will be addressed in a future upgrade.
The threshold changes have been implemented as follows:
| Indicator | Previous rule | Updated rule |
|---|---|---|
| Withdrawals |
Needs improvement if withdrawals > 15% and <= 35% of total cohort OR 250+ apprentices have withdrawn At risk if withdrawals > 35% of total cohort |
Needs improvement if withdrawals > 15% and <= 20% of total cohort At risk if withdrawals > 20% of total cohort |
| Learners past PED |
Needs improvement if > 15% of total cohort past PED by 180 to 364 days OR 250+ apprentices past PED At risk if > 15% of total cohort past PED by 365+ days |
Needs improvement if > 15% of total cohort past PED by 90 to 179 days At risk if > 15% of total cohort past PED by 180+ days |
| Breaks in learning |
Needs improvement if > 15% of total cohort on BIL for 180 to 364 days OR 250+ apprentices on BIL At risk if > 15% of total cohort on BIL for 365+ days |
Needs improvement if > 10% of total cohort on BIL for 180 to 364 days At risk if > 10% of total cohort on BIL for 365+ days |
QAR Reports - Improved Excel Output
The QAR / Achievement Rates reports have been updated to include an option which makes the drilldown more suitable for output to Excel.
The reports now have a new parameter called Use Excel-friendly drilldown. When this is set to No, the drilldown outputs as per usual. When it is set to Yes, the drilldown only includes the table (i.e. no header or footer) and date fields are formatted so that they are recognised as dates when output to Excel. This means the output can be sorted and filtered in Excel without any additional editing.
Achievement Rates Analysis Reports - Top-Level Employer Groupings
The Achievement Rates App Analysis, ET Analysis and Traineeship Analysis reports can now be configured so that the Employer groupings will consolidate learners on employer branches under their top-level employer instead. With the config disabled, the groupings will work as they previously did (i.e. learners will be grouped by individual employers and branches).
To enable this feature:
- Click the M5 button at the top left and select Options.
- Go to Reports Library on the left (in the Maytas 5 section).
- On the right, in the Achievement Rates section, tick the box for the config Merge branches under top-level employers in QAR reports and ensure the toggle button is set to ON.
- Click OK.