5.32 Maytas LLWR Release Notes
 View contents
Note regarding submissions
We would like to remind providers to create a submission early and check for any errors using reports from LLWR-Inform. Providers should also remember to download their ULI file. After submission to the DfE, providers should check that data has submitted correctly using the available reports. Providers should check that all their expected starts and completions are submitted correctly.
Our support desk gets extremely busy in the days prior to the submission deadlines, and although we try and prioritise submission-related queries, we cannot guarantee assistance if queries are sent late. If you do encounter any issues, please ensure that you contact Maytas Support as soon as possible, as we can only rectify issues of which we are aware. We also recommend checking Maytas Communities regularly for information on any known issues and solutions. Tribal cannot be held responsible for any issues caused by your failure to comply with this advice
Technical specification
The latest Maytas and Maytas Hub technical specification can be found here.
Once the upgrade has been completed, the version number should be checked to ensure it has been successful.
- Start Maytas and go to Support on the toolbar.
- Click About.
- The version numbers should read 5.32.9710.1. If you have any other version, please ensure you have followed the upgrade instructions correctly. If you require assistance, please contact Maytas Support.
It is the responsibility of customers to ensure that users carry out any required user acceptance testing and sign off on the upgrade.
Data migration
Please note that it is important to ensure that all 2025/26 learners have been entered before the upgrades are applied. This is because the upgrade migrates 2025 data to the 2026 fields, and any 2025 learners entered after the upgrades will not be migrated. As such, if any 2025 learners do need to be entered after the upgrade, both the 2025 and 2026 tabs must be completed to ensure all data is present and correct.
Complete the Upgrade
Features Added in the Upgrade
These are the main updates in the upgrade:
- LLWR tabs for 2026/27
- LLWR reports for 2026/27
- Updated LLWR validation rules
- LLWR batch export
- Lookup changes
- Cognassist integration
- Fixes to a number of issues
Create the 2026/27 DfE Contract
A 2026/27 DfE contract should be set up for each DfE contractor. Without this contract, Maytas is unable to determine the funding rules, schemes and lookup codes to use.
- Go to Management on the toolbar and click Contracts.
- Left-click the contractor (company) to which you wish to add the new contract.
- Click Add Contract on the ribbon.
-
Make sure that option 1. Existing company is selected then click Next.
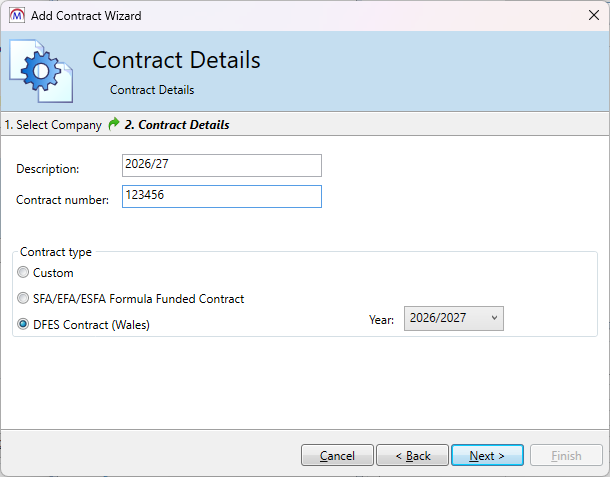
- Enter a contract description (e.g. DfE 2026/27).
- Enter a contract number if required.
- Select the DFES Contract (Wales) option.
- Select year 2026/2027.
- Click Next.
- Select the schemes you wish to include in the contract and click Next.
- Click Finish.
The Contract Wizard will create the appropriate funding model within Maytas and set up all the schemes that apply.
Maytas 5 Version 5.32.9710.1 Release Notes
2026/27 Contract Year Updates
New Maytas tabs for 2026/27 have been produced for the ILR and LLWR as per specifications from the Data Service and DfE. These will have been imported automatically in the upgrade. Please note that while both ILR and LLWR tabs are imported, the relevant tabs will only show for the relevant learners – i.e. ILR tabs will only show to learners on English schemes and LLWR tabs will only show to learners on Welsh schemes. Details of the tabs can be found below.
Please note that user permissions will need to be set for the new tabs, as by default they are available to all users. Also please note that if you have changed the field type for any ILR fields (e.g. to or from a lookup), these will need to be changed from the default field type in the screen designer.
LLWR Report for 2026/27
The 2026/27 Maytas 5 LLWR report has been produced based on a previous official form. Additional information not present on the official form has been included, such as employer and suspension data.
The LLWR report is automatically imported in the upgrade and can be found in the LLWR folder of the Reports Library.
There are two ways to run the report:
- On the Home tab, select Report Library | LLWR | LLWR 2026-27. This will let you search for a learner and select the sections to show.
- In a learner record, click Process and select LLWR 2026/27 Form. This will open a PDF export of the report for the learner / POT. It will use the default of showing all sections.
LLWR Export 2026/27
Generate Export
The LLWR export for 2026/27 is available in Maytas. The front-end functionality is the same as in 2025/26.
To view the LLWR export screen for 2026/27:
- Click Exports on the toolbar.
- Click LLWR Export on the ribbon.
-
Click the
 button.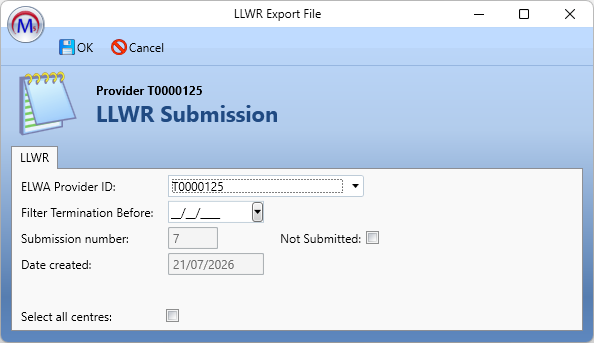
- Choose the ELWA Provider ID dropdown box.
- If you wish to only include learners who ended learning before a certain date, enter this date in the Filter Termination Before box.
-
Once ready, click OK.
-
Locate the submission by expanding the contract year and period using the arrows to the left. Click the submission to select it. The status will say GENERATE: Working on trainee… until the export data has been generated. It will then say Idle. Please note that this may take a while, depending on the amount of data being exported.

- Edit opens the export and allows you to view and edit the export settings. Please note that not all settings can be changed once an export has been created.
- Generate processes the export and produces a text file showing any errors for each learner. This allows you to correct any errors and re-generate before the batch file is created. The generation progress is shown with the circular progress bar to the right:
- View Log shows any errors in the export. These should be investigated and resolved and the data re-generated before outputting the XML.
- Output creates the actual batch file. The file will be created at C:\Temp on the Maytas server.
- Get File lets you download the batch file once it has been created.
LLWR XML Output
The LLWR export includes an option to create the submission file in XML format. This is much easier to read compared to the flat file, and it is also easier to locate information.
The ability to import the Overall Output file from the LLWR Data Collection site allows us to produce submission files consisting only of changes by default, as we can exclude records that have been accepted by the LLWR. At the beginning of each year a full file will be produced. Once the return Output file has been imported into the previous submission, only changes will be submitted.

The Output Changes XML link becomes active once the submission file has been generated. It will create an XML file on the server which can be retrieved by clicking Get File as normal. The file can be saved in XML format or as a zip file. The file can then be submitted to the Data Collection site. Please see the LLWR CSV User Tutorial from the Inform site for guidance on submission.
During the submission process, just after the Submit records to database step, you will have an opportunity to Download XML Output File (XML) from the Overview tab. It is important to do this as you will not get the option again after the Finalise Transaction process.
The XML Output file can be imported into Maytas on the submission by clicking Import XML Output File (this must be done on the same submission number that the export came from). This will indicate accepted records and provide error information. The Output file also contains ULI information which can be used to update the learner records in Maytas if required.
However, there are circumstances where the LLWR cannot provide the ULI at this stage, and consequently the ULI must be imported in the usual manner.
Once the XML Output file has been imported, subsequent XML files created will only include records that have not been accepted or where a change has occurred since the previous import. This can be overridden by ticking the Output Full XML checkbox near the top of the export screen.
Cognassist Integration
Maytas 5 is now able to connect to Cognassist so that users can be created in Cognassist from Maytas and users can be imported to Maytas.
A new licence is required for the Cognassist integration - please contact your account manager for more information.
Setup
First, three values must be obtained from Cognassist:
-
Client ID
-
Client secret
-
API URL
Once you have received these, they must be entered in the Maytas configuration options:
-
In Maytas 5, click the M5 button at the top-left and select Options.
-
Go to Other on the left (under the Maytas 5 header).
-
Locate the Cognassist section on the right and enter the relevant values into the options for API URL, Client Id and Client Secret.
-
You can also optionally configure email settings for new Cognassist users:
-
Welcome Email From Address - The email address used in the From field for the welcome email. If the config is not set, the default of noreply@maytas.com will be used.
-
Welcome Email Body - The email body for the welcome email. The parameters {FirstName}, {LastName}, {Email} and {NewLine} can be used to insert the user's name and email address or add a line break. e.g.:
Welcome to Cognassist, {FirstName} {LastName}. Your email address is {Email}.If the config is not set, a default email body is used.
-
-
Click OK.
Permissions must also be set to access the Cognassist features in Maytas:
-
Go to Tools | Edit Permissions.
-
Select the user or group that requires permission.
-
On the Modules tab, set the Cognassist Integration permission to Visible.
-
Go to the Commands tab and expand the Cognassist section.
-
Set the Cognassist Access permission to Visible.
-
Click Apply to save changes, then restart Maytas for the permission to take effect.
Finally, the Cognassist Data tab should be published:
-
Go to Tools | Publish / Unpublish.
-
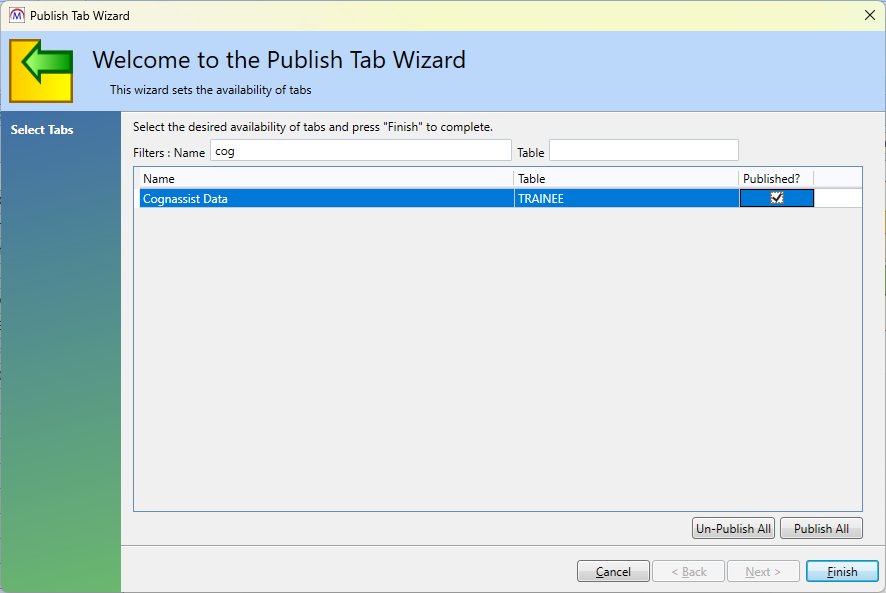
The Publish Tab Wizard will appear. Locate the entry for the Cognassist Data tab.
-
Double-click the Published checkbox so it is ticked.
-
Click Finish.
-
Go to Home on the toolbar and click the Sync button.
Send a Maytas learner record to Cognassist
Maytas learners can be sent to Cognassist to generate a Cognassist user for them. There are several prerequisites:
-
The learner must have an email address and their date of birth entered.
-
If a postcode is entered, it must be a valid postcode (learners with no postcode entered are also valid).
-
The learner must have an active link to an assessor, and the assessor must have a user record in Cognassist with the same email address as their Maytas assessor record.
To send a learner to Cognassist (or update data for a learner already linked to a Cognassist user):
-
Open the learner's record in Maytas.
-
Click Cognassist on the ribbon and select Send To Cognassist.
-
If no matching record can be found for the learner, a user will be created in Cognassist associated with the learner and you will be asked if you wish to send an assessment request (click Yes or No as required). The learner will also be emailed with their user details.
If the learner already exists in Cognassist, their Cognassist user will be updated with any relevant data changes from Maytas.
The learner's Cognassist data can be viewed in Maytas on the Cognassist Data tab.
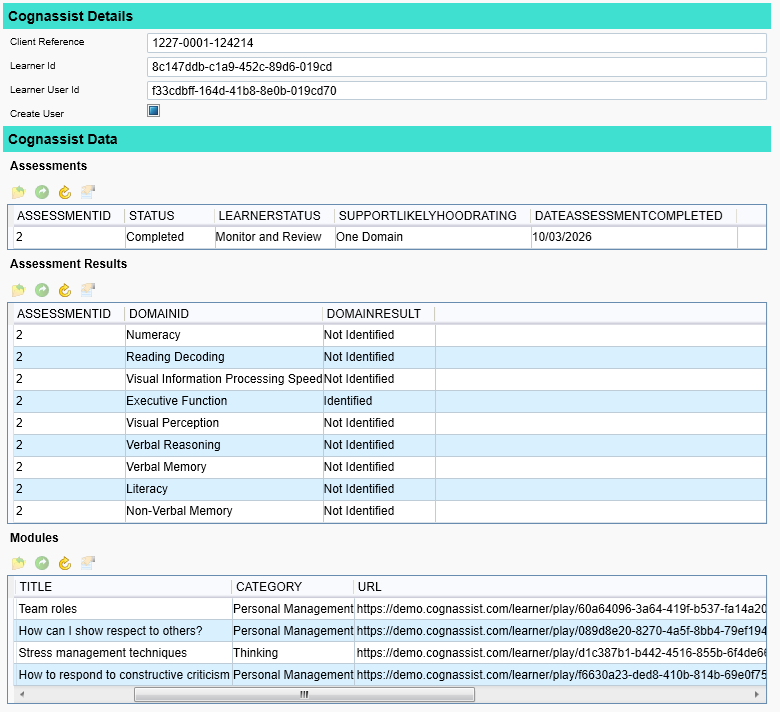
Link a Maytas learner record to a Cognassist user
To link a Maytas learner to an existing user in Cognassist:
-
Open the learner's record in Maytas 5.
-
Click Cognassist on the ribbon and click Link Learner.
-
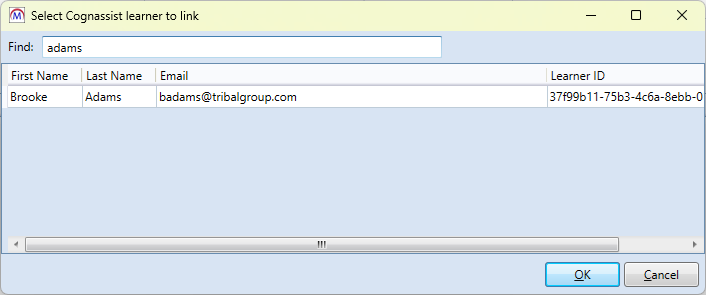
A window will appear with a list of Cognassist learners. The Find box can be used to locate the required record.
-
Select the record to link the Maytas learner to and click OK.
-
A message will appear confirming that the Maytas learner is now linked to the selected record in Cognassist. Click OK.
If you wish to unlink a Maytas learner to a Cognassist user:
-
Open the learner's record in Maytas 5.
-
Click Cognassist on the ribbon and click Unlink Learner.
-
Click Yes to confirm. A message will appear confirming that the Maytas learner is no longer linked to a Cognassist record. Click OK.
Get Cognassist assessment data for a Maytas learner
Once a learner is associated with a Cognassist user, their Cognassist assessment data can be downloaded to Maytas:
-
Open the learner's record in Maytas 5.
-
Click Cognassist on the ribbon and click Get Assessment.
-
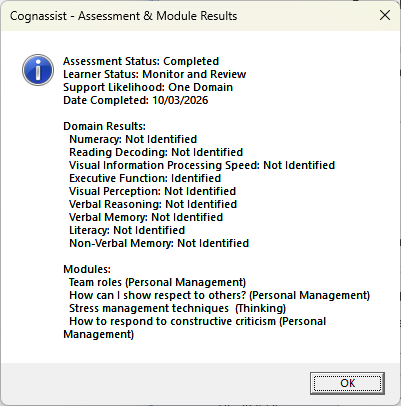
A message will appear with a summary of the available data that has been downloaded. Click OK.
-
The data can be viewed on the learner's Cognassist Data tab.
Bulk create Cognassist users from Maytas learners
If you wish to generate Cognassist users for a bulk group of Maytas learners, this can be done as follows:
-
Go into the learner record for each learner you wish to create a Cognassist user for, go to the Cognassist Data tab and tick the Create User checkbox.
Alternatively, you can update the field TRAINEEINFO.COGNASSIST_CREATEUSER with a value of Y using the Global Updater.
-
Go to Management on the toolbar, click the Cognassist button and select Create Users.
-
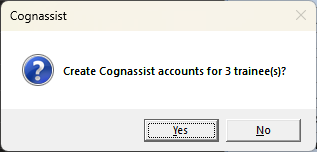
You will be asked to confirm creation - click Yes to continue.
-
You will then be asked whether to send an assessment invite to each learner - click Yes or No as required.
Assessment invites can be sent manually from a learner's record by going to Cognassist | Send Assessment Invite.
-
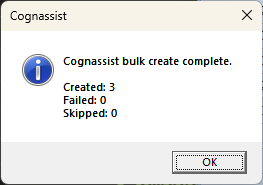
The accounts will now be created (this may take a while, depending on the number of learners being sent). When finished, the results will be displayed, along with the reasons for any failures (e.g. email address not supplied). Click OK.
Download bulk data from Cognassist
To download assessment data in bulk from Cognassist:
-
Go to Management on the toolbar, click the Cognassist button and select Get Data (Bulk).
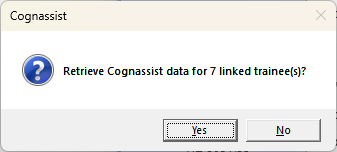
-
You will be asked to confirm - click Yes to proceed.
-
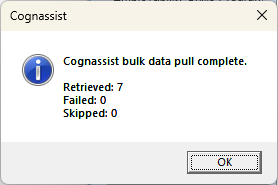
The data will now be downloaded (this may take a while, depending on the number of learners and the amount of data). When finished, the results will be displayed. Click OK.
Report Generator - Maytas API Updates
Publish view to Maytas 6 Query Builder
When publishing a report in Report Generator as a Maytas API view (see here), this can now be made available in the Maytas 6 Query Builder:
-
Go to Home on the toolbar and click Edit on the Reports panel of the ribbon.
-
Open the report you wish to use or create a new report.
-
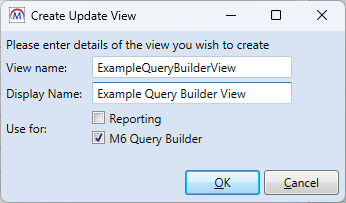
On the Actions toolbar, go to Views | Create API view.
-
Enter a name for the view (this cannot include any spaces) and the display name.
-
Tick the M6 Query Builder checkbox.
-
Click OK.
-
Click Apply. You will be notified that there is a Maytas API view associated with the report - click Yes to update the view.
Include functions in API views
When publishing a report in Report Generator as a Maytas API view (see here), this will now include any functions that exist within the report.
Recognised Prior Learning (RPL) Beta Tab
The RPL features included in this release should be considered a beta version and so please be aware that issues may be encountered. RPL features are also subject to change in future releases.
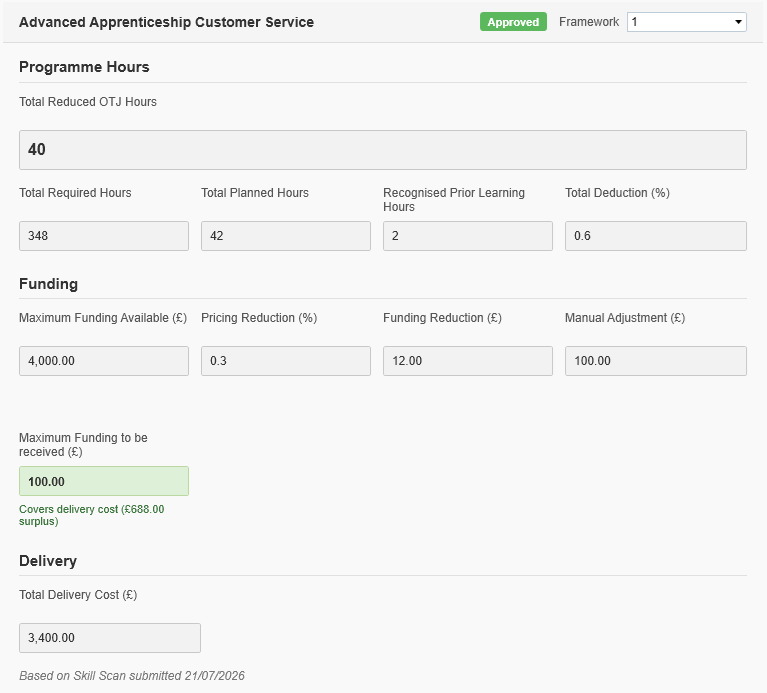
The RPL beta tab is now available when viewing a learner record. The tab is used to calculate the maximum funding to be received for each of a learner's base modules, versus the total delivery cost.
As this is driven by Maytas Hub, the full details of the RPL features can be found in the Maytas Hub release notes.
Report Scheduler - Active Checkbox
When scheduling reports, there is now a Schedule is active checkbox on the Schedule screen which determines whether the schedule will run or not. The checkbox is enabled by default.
This is primarily intended for cases where testing a report schedule has resulted in it being disabled, in which case re-ticking the Schedule is active checkbox will re-enable the schedule.