Templates
Templates in Maytas 5 allow you to apply a pre-determined set of data on an entity such as a learner, assessor or employer. For example, when a learner is taking certain qualifications, some fields will always require one specific value. A template can be created to set these values automatically when the learner is placed on the qualification. Another example would be a leaver template which sets fields detailing progress to the appropriate value for leaving a qualification (different templates could be set up for early leavers, suspensions, achievers, etc).
 Templates are hierarchical, which means new templates can be created under existing templates. When a child template is applied, the parent template(s) are applied first. For example, a parent NVQ template could have child templates for each NVQ level. If the NVQ Level 1 template was then applied, the parent NVQ template would be applied first, then the Level 1 template.
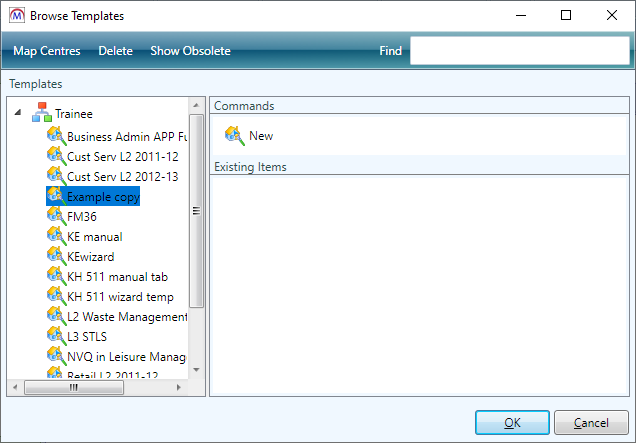
To start the Templates Editor, go to Tools on the toolbar and click Browse Templates.
Template Designer
-
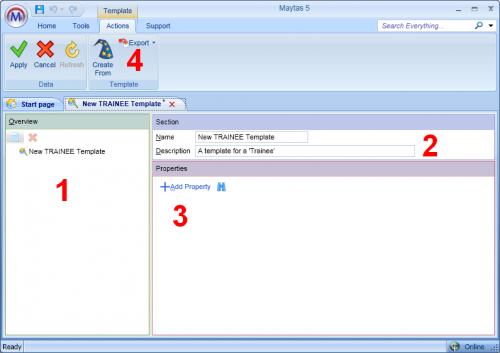
Overview Panel
The Overview panel shows the structure of the template. The top level is based on the database area that the template is created under (e.g. in this case, since the template was created under the TRAINEE area, the top level is based on the TRAINEE table). Related tables (such as TRAINEEPOT and TRAINEEPOT2) can be added under the top level.
-
Section Panel
This lets you change the template name and description. Different names and descriptions can be edited for each level of the template.
-
Properties Panel
The Properties panel is where the field values are set. The selected level of the template overview determines which tables are available for use on the Properties panel.
-
Template Ribbon
The Template area of the ribbon lets you export templates and create new templates based on existing entities (such as learners, assessors, employers, etc).
Create an Example Template
- Click Tools on the toolbar.
- Click Browse Templates on the Template panel.
- In the window that appears, the different areas of the database are listed on the left. When hierarchical templates have been setup, these can be drilled into on the left. Select Trainee.
- Any existing templates are listed on the right. Double-click New.
- You will now see the template designer. Change the name of the template to Example Achiever Template and the description to Sets leaver field values for an achiever.
- Currently only the TRAINEE table is available on this template. Most of the fields relevant to leavers are on the TRAINEEPOT and TRAINEEPOT2 tables. On the Overview panel, right-click Example Achiever Template, select New and click Trainee POT. This will add another level to the template structure.
-
On the Properties panel, click +Add Property. A new property will appear below.

The left drop-down box lets you select the table. The right box lets you select a field from the selected table. Clicking the blue cross to the right will delete the property.
-
Choose TRAINEEPOT from the table box and COMPLETIONSTATUS from the field box.
Since TRAINEEPOT2 is an extension of TRAINEEPOT, the TRAINEEPOT2 table is included in this table list.
-
Once the field has been selected, the value box will appear. The text to the left (in this case, Single character) informs you what format the value should take. The COMPLETIONSTATUS field requires a single character (in lookup terms, this is the short string).
Enter 2 in the value box, which is the short string for Completed the learning activities.
- Add another property and set the table and field to TRAINEEPOT and GAINEDNVQ.
- Enter the value as W, which is the Maytas short string for this field for Achieved.
- There are several more leaver fields which can be added, but for this example click Apply to save the changes then close the template.
- Open an example learner (since the template will change data).
- Click Template on the Apply panel on the ribbon and choose Example Achiever Template from the list. The COMPLETIONSTATUS and GAINEDNVQ fields will now be updated for the learner.
- Click Apply if you wish to save the changes to the learner.
Map Templates
Templates can be mapped to specific contracts. To do this:
- Go to Tools on the toolbar and click Browse Templates.
-
Click Map Centres.
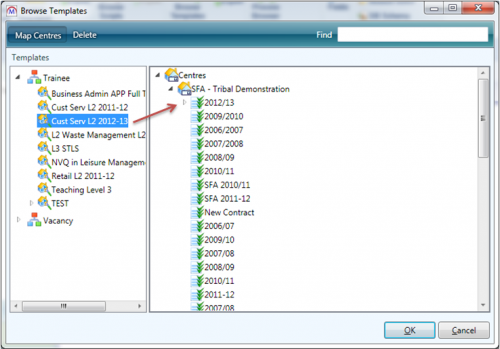
- Expand the Trainee or Vacancy category on the left to locate the template you want to map.
- Expand the contractor on the right containing the contract you want to map to.
- Click and drag the template onto the contract.
- Click Yes to confirm.
Once this has been done, it can be applied in a process by using an ApplyTemplateActivity. The activity should be added after a step where the user selects a contract, and in the activity's properties, Filter templates must be set to True.
Flag a Template as Obsolete
To flag a template as obsolete:
- Go to Tools | Browse Templates.
- Expand the relevant area on the left and select the template on the left.
-
Right-click the template on the left and select Obsolete. The template will now be hidden by default.
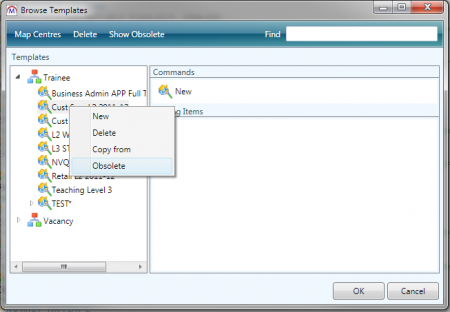
- You can display obsolete templates by clicking the Show Obsolete button at the top. To change a template so it is no longer obsolete, right-click it and click Obsolete again.
- Click OK when finished.
Map Template to Centre / Contract
To map a template to specific centres and contracts:
- Go to Tools | Browse Templates.
- Click the Map Centres button.
-
Expand the relevant area on the left.
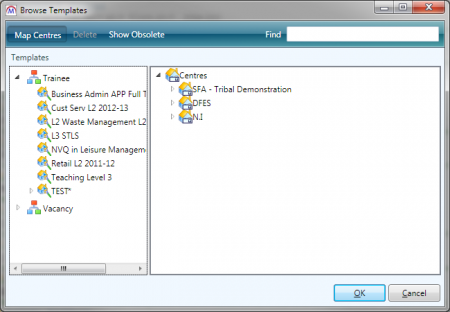
- To assign a template to a centre, drag it from the left over to the centre on the right.
- You will be asked to confirm the mapping. Click Yes to continue.
-
The centre will expand to show the contracts within it. At the bottom of the contracts list you will see the template that has been assigned to the centre.
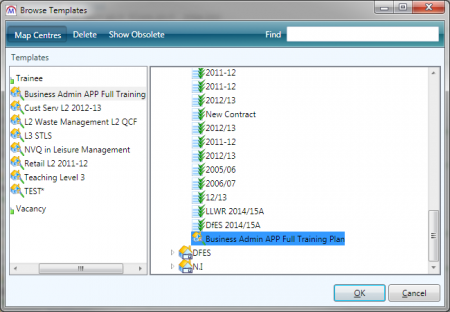
- To assign a template to a contract, drag it from the left onto the contract on the right.
- You will be asked to confirm the mapping. Click Yes to continue.
- The template will now be displayed under the contract.
-
To remove a template mapping from a centre or contract, right-click the template on the right side of the screen and select Delete. Click Yes to confirm.
Please note that this will delete the mapping, not the actual template.
- Click OK when finished.
Import and Export Templates
To export a template:
-
Go to Tools on the toolbar and click Export on the Templates panel of the ribbon.
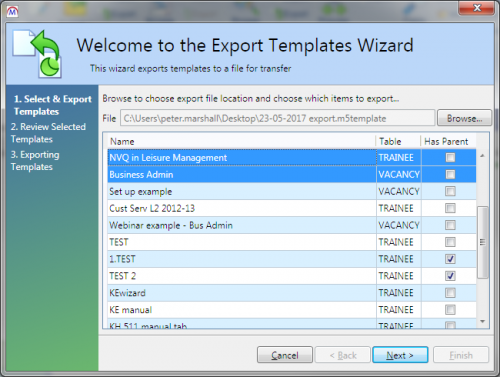
- Click Browse, go to the location you wish to save the template, enter a filename and click Save.
- Select the templates you wish to export (hold ctrl to select multiple templates or hold shift to select all templates between two selections).
- Click Next.
- You will see a preview of the templates to be exported. Note that if you selected any child templates but not their parent templates, the parent templates will be included. Click Next.
- Click Finish.
To import a template:
- Go to Tools on the toolbar and click Import on the Templates panel of the ribbon.
- Click Browse, navigate to and select the file to import and click Open.
- Click Next.
- Click Finish.
Copy Templates
New templates based on existing templates can be created as followed:
- Go to Tools | Browse Templates.
- Browse to and select the template you wish to copy.
-
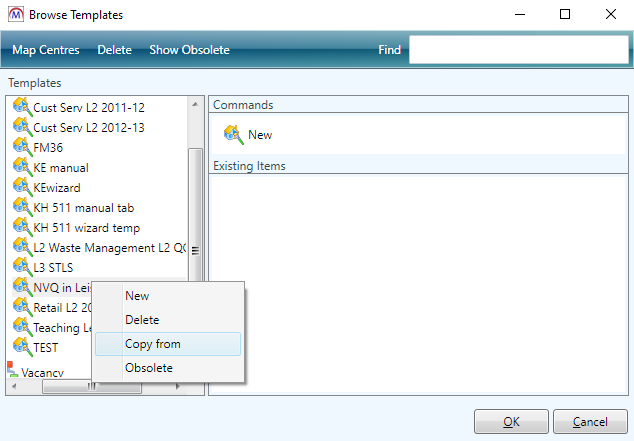
Right-click the template and select Copy from.
-
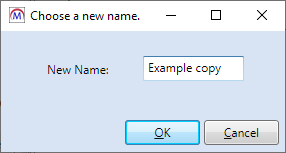
You will be prompted to enter a name for the copied template (this cannot be the same as an existing template name). Enter a name and click OK.
-
The copied template will now be created and will appear in the tree list. It can now be opened and edited as required.
