Allowances
The Allowances module allows you to process allowance payments for learners, such as expenses and equipment costs. The various allowance and invoicing tools can be found by going to the Management tab and clicking Payments on the Finance panel of the ribbon.
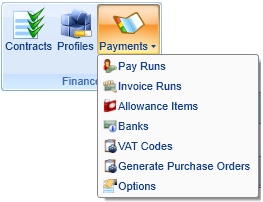
Please note that permissions must be set for the Payments button to appear. To do this:
- Go to Tools | Edit Permissions.
- Select the user or group that requires permission.
- Go to the Commands tab and expand the Payments section.
- Set the Payments Module permission to Visible.
- Set any other payment permissions as required.
- Click Apply and restart Maytas 5.
Allowances Overview
The general process for entering and processing allowances is as follows:
- Standard allowance items are added to the system. These can be anything for which learners are paid an allowance.
- Items are added to individual learners from the standard list of allowance items. Values can be modified as required.
- A pay run is generated. This will process all outstanding (i.e. unprocessed) learner allowances between two dates. Individual items in the pay run can be modified as required.
- Once all details are correct, the pay run can be finalised to prevent further changes.
- The allowance reports can then be run to view the payments which have been made.
Setting up Standard Allowance Items
Standard allowance items can be created with default values. They can then be added to learners and modified if required.
To add an allowance item:
- Go to Management on the toolbar and select Payments | Allowance Items.
- Click the
 button to add a new item.
 -
You will see the Allowance Item window.
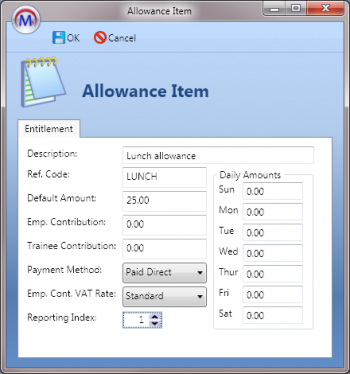
Enter the following details:
- Description – A description of the allowance item. This could be, for example, travel, lodgings, bonus payments, etc. It could also be a negative payment, such as a deduction from pay for provision of work clothing.
- Ref. Code – A reference code for the item. This could be used to record the cost centre code or, alternatively, an abbreviation of the item (e.g. for travel expenses the reference code could be TRAVEL).
-
Default Amount – The default amount associated with the allowance item. For travel expenses, this would usually be left as 0.00 on the standard item as travel can vary per learner and would therefore be entered for each individual.
The payment frequency is specified when the item is added to each learner (the default is weekly payments).
- Emp. Contribution – If an employer pays part of the standard allowance, this can be entered here. Maytas 5 provides the facility to invoice employers for the contribution. Please note that this is the amount the employer contributes out of the default amount. For example, if the learner is paid £50 and the employer contributes £10, the default amount would be recorded as £50 and the employer contribution would be recorded as £10.
- Trainee Contribution – If learners are required to pay part of the allowance item (e.g. the first £3.00 of travel expenses), this can be entered here.
- Payment method – This determines who pays the allowance item. There are two options: Paid Direct (i.e. by the provider) and Paid by Employer.
- Emp. Cont. VAT Rate – The employer’s contribution may be subject to VAT and be reclaimable by the provider. The VAT rate can be selected here. It is therefore possible to generate a VAT-only invoice for an employer.
-
Reporting Index – This can be used to show and group items on the Payments Listing report. If multiple items have the same reporting index, they will be totalled under one item in the report.
The Daily Amounts are not actively used in allowances and are included for reporting purposes only.
- Click OK when finished. Additional items can be added as required by following the above steps.
To view or edit an allowance item, select it from the list and click Edit. To delete an item, select it and click Delete.

Setting up Allowance Entitlements for a Learner
Once standard allowance items have been created, they can be assigned to individual learners as entitlements:
- Open a learner record and go to the Allowances tab.
- There are two screens on the Allowances tab:
- Payments – This is used to record payments which have been made to the learner.
Entitlements – This is used to record the allowances which the learner receives.
Go to the Entitlements screen.
- Click the
 button to add an allowance item to the learner.
 - You will see a list of the available standard allowance items. Select one and click OK.
-
This will open the Allowance Entitlement window.
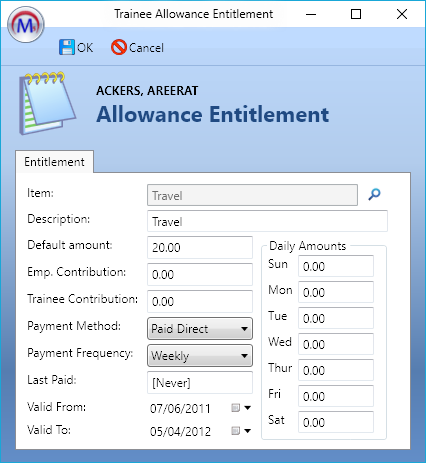
The values from the standard allowance item will be shown here and can be edited as required. Please note that when the values are edited in this window, the changes apply only to the individual learner – the standard item will retain the default values.
- Default Amount – Amend the amount to what the learner gets paid each time the allowance is processed (see Payment Frequency below to determine how often the payment is made). For example, if the learner is paid £50 a week for the item, change the Default Amount to 50 and leave the Payment Frequency as weekly.
- Emp. Contribution – Amend the employer contribution as required. Please note that this is the amount the employer contributes out of the default amount. For example, if the learner is paid £50 and the employer contributes £10, the default amount would be recorded as £50 and the employer contribution would be recorded as £10.
- Trainee Contribution – Amend the learner’s contribution as required. This is generally only entered for travel entitlements.
-
Payment Method – Change as required. Paid Direct means the provider pays the default amount, whereas Paid by Employer means the employer pays the default amount.
The following fields are additional to the standard allowance item fields:
- Payment Frequency – This determines how often the payment is made (weekly, fortnightly or once). The default is weekly payments. Please note that the daily option is included only for reporting purposes (it will function the same as the weekly option if selected).
- Last Paid – This shows the last date the allowance was paid to the learner.
- Valid From – This is the date from which the allowance will be paid. It defaults to today’s date.
-
Valid To – This is the date up to which allowances will be paid. It defaults to the learner’s planned end date.
If a learner ends learning before their planned end date or continues in learning past their planned end date then this date may need to be amended. Allowances are processed up to the Valid To date, regardless of the learner’s termination date.
- Click OK when finished.
Recording Learner Attendance
Attendance can be recorded in the learner diary and used to determine any days which should be deducted from a learner’s entitlements due to absence. It is possible to specify which attendance codes should cause pay runs to automatically stop for adjustments. Please note that attendance records are simply a flag to indicate learner attendance – any adjustments to allowance payments must be made manually.
To record attendance:
- Open a learner record and go to the Diary tab.
- Click the
 button, choose Trainee Attendance and click OK.
 - Choose the type of attendance from the dropdown list (e.g. holiday, sickness, etc).
- Enter the start time and end time (this will automatically update the Days duration box).
- The Allowance Deduction box can be ticked if the allowance has already been deducted for the period of absence. When generating a pay run, if the absence period is outside of the pay run period, the pay run will not halt if the Allowance Deduction box is ticked. If the box is not ticked, the pay run will halt due to the attendance record. Also, if the absence period is within the pay run period, the pay run will halt regardless of the Allowance Deduction box.
- Click OK.
To specify which attendance codes should be used to automatically halt a pay run for adjustments:
- Select Management on the toolbar and go to Payments | Options.
-
Enter the codes in the Stop on codes box. They should be comma-separated (e.g. A,S,U). The codes can be found in the lookups for the REASON field on the ATTENDANCE table. By default, the codes are:
Shortstring Longstring A Authorised Absence S Sickness U Unauthorised Absence H Holiday B Bank Holiday
Click OK when finished.
Running Allowances (the Pay Run)
The pay run processes outstanding allowance payments. To start a pay run:
- Go to Management on the toolbar and select Payments | Pay Runs.
- Click the
 button.
 - Enter the following details for the pay run:
- Run number – This is auto-generated, but can be altered to a more meaningful alphanumeric format if required.
- Period end date – This is the last day of the week for which pay is to be calculated.
- Payslip date – The date recorded against the payslip.
- Trainee Batch – This can be used to perform a pay run on a particular group of learners. It maps to the ALLOWANCEBATCH field on the TRAINEEINFO table, and lookups can be created for this so that they display in the pay run wizard. It is possible to perform a pay run for one batch, then re-run it for another batch to include multiple batches in the same run. If no batch is selected, all applicable learners will be included.
- Processing Mode – There are three options:
- Stop on all trainees – This will halt the pay run on each learner for editing and confirmation.
- Stop only on trainees requiring attention – This will halt the pay run on the following learners:
- Learners who have terminated but still have allowance entitlements.
- Learners who have attendance records which are not flagged as deducted or are within the pay run period.
- Learners who have exceeded the high / low payslip amounts, as specified in the allowance options. These can be accessed by going to Payments | Options. The warning threshold will warn you of the high / low amount but allow you to continue, whereas the error threshold will not allow you to continue.
- Learners for whom an invoice will be generated but have no valid placement.
- Do not stop at all – This will perform the pay run without halting on any learners.
- Run only for this centre – When this is ticked, only learners in the centre you are currently logged into will be included. When un-ticked, learners from all centres will be included.
- User Run for Invoices as well – This will create a row in the invoices editor for this pay run. Please note that the invoices will not be automatically generated until you perform an invoice run for the row.
- Click Next when ready.
-
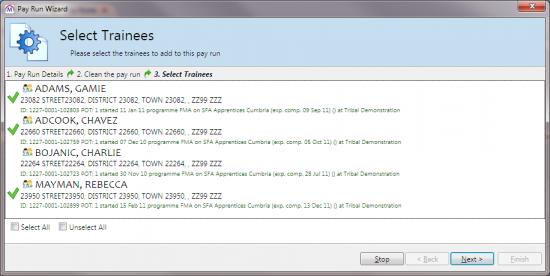
You will see a list of learners with outstanding allowance payments for the selected period end date. Click the learners you wish to include in the pay run (a green tick will appear next to them) and click Next. Please note that you can select or unselect all learners in the list by using the checkboxes at the bottom of the window.
-
At this point, the pay run may halt on certain learners, depending on what was chosen for the Processing Mode on step 3. If it does halt, you will see the Edit Payslip screen for a learner.
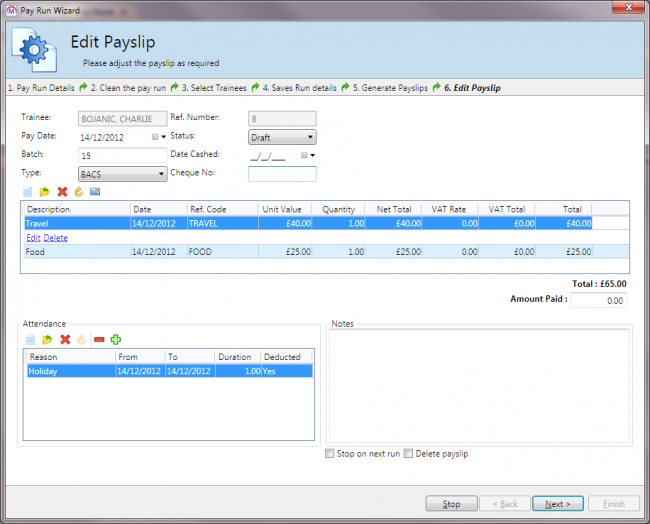
At the top of the screen you can edit the pay date, batch number, payment type status (draft or final), the date the payment will be cashed and the cheque number (if applicable).
The table in the middle of the screen lists the learner’s allowance entitlements. These can be edited as required. You can also add additional entitlements or delete entitlements from the payslip. The
 button can be clicked to open the adjustment calculator, which can be used to calculate payment changes based on the number of days paid and any learner contributions. Please see the Adjustment Calculator page for more information.
The table at the bottom-left of the screen lists attendance records from the learner’s diary. These can be edited, added or deleted as required. You can also select an attendance record and click the
 button to flag the relevant period as deducted. Please note that this will not automatically deduct the allowance payment for the days of absence – the value must be adjusted manually. Clicking the
  button will flag the attendance record as not deducted. Once an attendance record has been flagged as deducted, it will no longer appear in future pay runs.
At the bottom-right you can enter notes for the payslip. There are also checkboxes to allow you to flag the learner to be stopped at on the next pay run or to delete the payslip from the run entirely.
Click Next when ready.
- Once all applicable learner payslips have been configured as required, the payslip will be processed. Click Finish.
Viewing Payslips
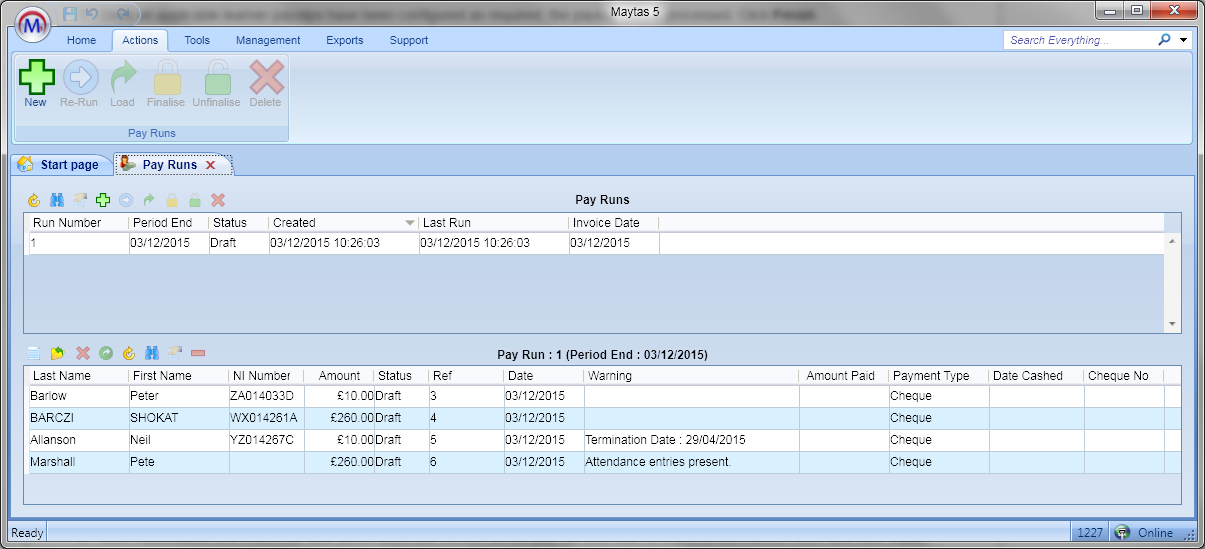
Once a pay run has been processed, individual payslips can be viewed and edited (please note that in this context, a payslip refers to the pay record for a learner on a specific pay run). To view a payslip:
- On the Pay Runs screen (go to Management | Payments | Pay Runs), select a pay run from the top table and click the
 button. This will load the payslips from the pay run into the bottom table.
 - Select a payslip from the bottom table and click Edit to view the details.
- Make any changes to the payslip as required and click OK.
Allowance Reports
Before finalising the pay run, it is highly recommended to run the allowance reports to ensure the figures are as expected. Full details of the reports can be found on the Reports Library page.
The Allowance Finance Statement Summary report will give an overview of the payments between two dates. To run the report:
- In the Pay Runs editor, click Allowance Finance Statement Summary on the ribbon.
- Click Parameters and check the date parameters are correct for the pay run you wish to check (if not, correct them and click View).
- Check that the values in the report are as expected. If not, modify the payslips as required and re-run the report.
Finalising the Pay Run
Once you have checked the allowance reports to ensure the results are correct, the pay run should be finalised so that no further adjustments can be made to the payment details.
To finalise a pay run:
- Go to Management on the toolbar and select Payments | Pay Runs.
- Select the pay run from the top table and click the
 button to finalise it.
 - You will be prompted to confirm the finalisation. Click Yes to confirm.
- The pay run will now be finalised. Learner allowances and payslips cannot be amended in a finalised state.
Pay runs can be un-finalised if amendments need to be made. To do this, select the pay run from the top table and click the button. Click Yes on the confirmation to un-finalise.
VAT Rates
In order to, for example, analyse the VAT content of a payment item or generate invoices to employers, it is important that the current VAT rate is set up. Also, it may be required to amend the rates in the event of changes in legislation.
To set up VAT rates:
-
Go to Management on the toolbar and select Payments | VAT Codes.
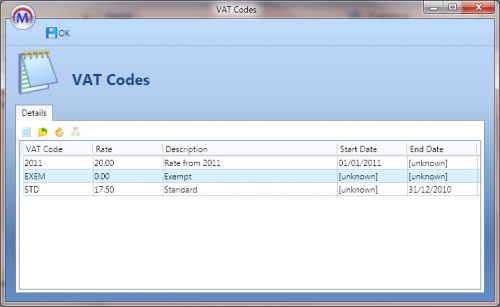
- Click the
 button to add a new VAT rate.
 - Enter the following details:
- Code – A reference code for the VAT rate.
- Description – A description of the VAT rate.
- Rate – The percentage VAT rate.
- Valid From / To – The dates between which the VAT rate is valid.
- Click OK when finished.
To edit a VAT code, select the row and click Edit. There is also the option to record a rate change against a single VAT code; for example, to record the change from 17.5% to 20% in January 2011. To do this:
- Select the VAT code and click the
 button.
 - Set the change date to when the VAT rate changed and enter the new rate.
- Click OK.
This will add a separate VAT row with the same VAT code, with the start and end dates updated for both rows to reflect when the rate changed.
