Learner Profile
Each learner has a profile which contains all Maytas Hub information relating to them. To view a learner’s profile, click the learner on either the Caseload or Browse Trainee screen.
Once a learner has been selected you will see their profile. The profile is divided into a number of tabs:
Summary
The Summary tab shows an overview of the learner’s progress.
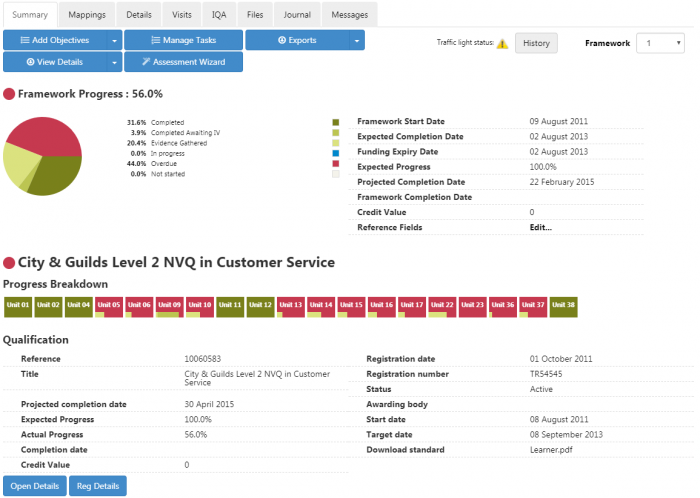
At the top of the screen are buttons to add objectives, manage tasks, export a learner's PLP or portfolio, view a learner's basic details or create an assessment.
If a learner has more than one framework in the database, each one can be chosen from the Framework dropdown box at the top-right of the screen.
The Framework Progress pie chart shows the percentages of the framework completion by the following categories: completed, completed awaiting IV, evidence gathered, in progress, overdue, not started. Hovering over each section of the pie chart will show the relevant details.
Each of the learner's modules is listed down the rest of the page with details of each module. Each one shows a progress breakdown by unit. This uses the same colour key as the Framework Progress pie chart, with the main background colour of the unit showing its status, and the bar along the bottom showing its progress.
For example, the unit below is In Progress (blue), with most of its required evidence being Completed Awaiting IV (light green) and some Evidence Gathered (dark green).

Clicking on the unit text will open the details of that unit.
Mappings
The Mappings page details the evidence progress for each of the learner’s objectives. The qualification to display can be selected from the dropdown list at the top of the screen. You can then optionally filter by units.
For each objective, the overall completed evidence compared to required evidence is shown. These are colour coded to show objectives with 1, 2 or 3 or more missing pieces of evidence. A breakdown of the completed evidence by evidence type is also shown. Any completed evidence is shown under the relevant evidence type heading and can be clicked to view it.
Details
The details page shows a hierarchy of the learner's objectives, with modules at the top level, then units, then elements. Click the + button next to a unit to expand it and show the elements underneath it (if a unit has no elements then the button will not appear).
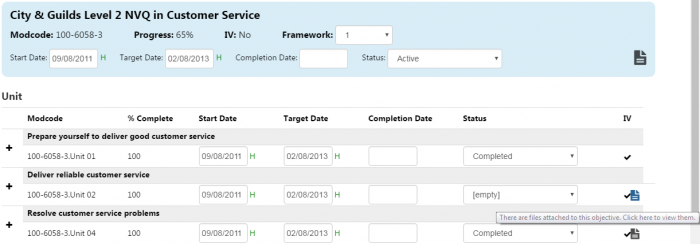
For each objective you can set the framework number, the start, target and completion dates and the objective's status. Changing any of these will show a message asking if you wish to apply the change to any children objectives underneath it in the hierarchy. Click Yes to do this, or No to only apply it to the parent objective. Click Save to commit any changes.
Files that have been attached to objectives in Maytas can now be downloaded from the learner Details screen in Maytas Hub. This applies to objectives at all levels (i.e. base modules, units and elements).
Objectives with files attached via Maytas will have a  button at the end of the row. Clicking this button will show a list of the available files, and clicking a filename will download that file.
Visits
Full details of visits can be found on the Visits Planner page.
The Visits page shows a list of all the learner’s visits. There is a dropdown box which lets you sort the visits by type, the planned date, the actual date or the outcome. Visits can also be filtered by a specific type. Click Refresh to apply the sorting and filter options.
Also at the top of the screen there are buttons which let you create an Assessment, Add a Visit and Plan Reviews. Please see the Assessment Wizard page for information on creating assessments.
Clicking a visit from the list will open it. Each visit is divided over a number of tabs:
-
Edit appointment – This tab shows the visit type, the planned date/time of the visit, the actual date/time of the visit, any general (non-evidence) files attached to the visit, any assessor notes and the visit outcome.
The planned and actual dates each have an All Day Visit checkbox, which can be used instead of entering start and end times. Any files which are attached to the visit can be viewed by clicking the filename. A visit notes template can be applied by selecting the template from the dropdown list and clicking Apply.
- Update learning plan – This shows a list of the learner’s objectives. Click an objective to open its details and enter notes and a target date. Click More at the bottom left of the objective details to enter the progress status and progress notes. Click Save when finished.
-
Add/update evidence – This shows evidence files attached to the visit. To add a file, click Add and choose the file. You can then select the units and criteria to which the evidence file relates, as well as the type of evidence (from the dropdown box beneath the Add button). Click Save at the bottom-right of the screen when finished.
To view the different files attached to a visit, select them from the dropdown box next to the Add button.
- Notes – This shows comments made about the visit, grouped by IV feedback, learner feedback, counter signing, assessor feedback, second line assessors and GLH. If you wish to add a comment, click Add, choose the comment type, attach any relevant files, enter the comment and click Save.
- Progress - This page shows the learner's progress from within the visit, which removes the need for having to leave the visit to view progress.
Visits filtered by framework / POT dates
When filtering visits by a date range, there is an option to retrieve the dates from a framework or POT. To do this:
- Open a learner record and go to the Visits tab.
- Click Filters.
-
Click Get Dates. You will now see a list of available frameworks and POTs to choose from.
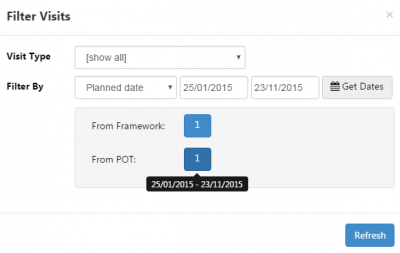
- Click the button for the framework or POT you wish to use (you can view the dates by hovering the mouse over each button). The dates will then appear in the Filter By section. Please note that for POTs, the dates used are the start date and the planned end date.
- Click Refresh to apply the filter.
- Your filter selections for the trainee will also be remembered and remain applied until changed, even after logging out and back in again.
IV (horiz)
The IV (horiz) page shows a breakdown of the learner’s qualifications by unit, detailing whether each unit is in progress (blue), awaiting IV (red) or has been IVd (green). Each unit can be accepted, sampled or deferred by an IV user, and IV activity on any of these is indicated by a tick. Hovering over a tick displays the date of the activity.
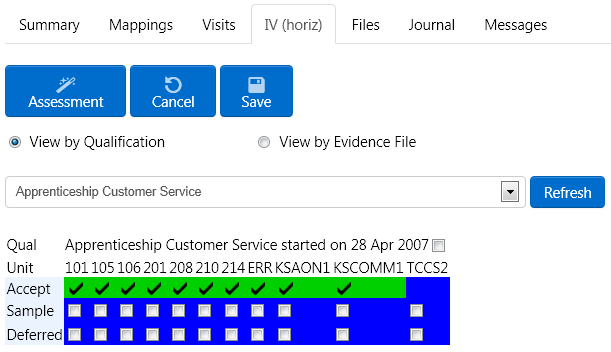
For units awaiting IV, an IV user can click the unit number to review the evidence, then tick the appropriate checkbox (accept, sample or deferred) to IV the unit. This will open the assessment wizard. Complete the assessment as necessary and click Save.
There is also the option to view by evidence file, which lists all evidence files including the date of the evidence, the type of evidence and the units which the evidence assessed. To IV a unit in this view, click Select next to the appropriate evidence. The IV user can now accept, sample or defer the unit by ticking the relevant checkbox and clicking Save at the top of the screen.
The Show only units box is ticked by default. Un-ticking it will list elements as well as units.
Files
The Files page shows all uploaded files that are associated with the learner. Files can be sorted by file type, the created date or the reference number and filtered by the evidence type. Click Refresh to apply the sorting and filter.
Each file shows the reference number, the file name, the type of evidence, any associated notes and the date it was uploaded. Next to the type you can click Amend to change the evidence type from a dropdown box. Once this has been done, click Update to apply or Cancel to revert back to the original type.
Click on a file to download it. You can also click the Export Portfolio button to download a portfolio containing all a learner's files.
To create an assessment for a file, click Assess file at the end of the appropriate row. This will launch the assessment wizard. For files that have already been assessed, click the  button next to it to make any amendments.
Journal
Every learner and assessor has a journal which displays a list of entries posted by themselves and their other associated users. For example, an assessor will see entries they have posted as well as entries posted by the learners in their caseload. An IV/Manager user can also view and make comments on journal entries for assessors/learners below them, as well as for their own entries. Only the logged in learner/assessor and their associated permitted users can view, add and comment on journal entries.
To add a journal entry, click New Journal. Enter the subject and message body. Files can be attached to the journal post by via the Browse button (once the file has been selected, click +Add to attach it to the post). Click Post to post the journal, or Cancel to abort the journal entry. New entries will appear at the top of the journal list.
Comments can be made against journal entries. To do this, click the Comments link underneath an entry. You can then add a comment in the same way as adding a journal entry. Any existing comments will also be displayed at the top of the screen.
Messages
This shows a list of messages sent to and from the learner. Click a message to view it.
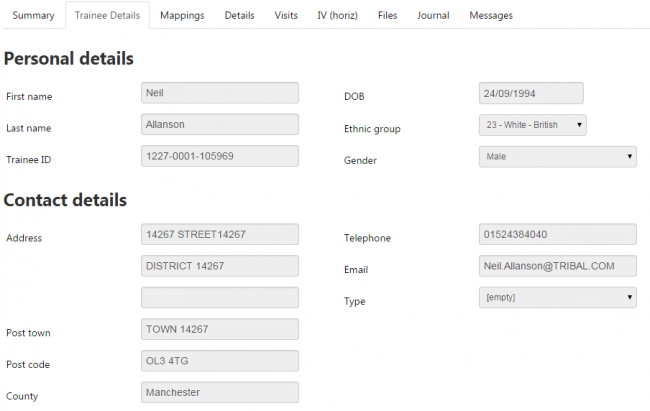
Trainee Details
A config option is available to display basic trainee details on trainee records. To enable this:
- Select Settings on the toolbar and click System Configuration.
- Select Assessor Login under the Maytas Hub Online header.
- Scroll down to the Trainee section and tick the box next to Trainee details view available from trainee summary. Ensure the toggle box is set to ON.
- You can also replace the default Trainee Details screen with a custom one created in Maytas (see the Screen Design page for information on publishing a Maytas tab in Maytas Hub). To do this, tick the box next to Replace trainee details view with custom tab and enter the name of the custom tab in the box.
- Click Save.
You will now see a Trainee Details screen on trainee records.
Ordering of Units by Target Date
The summary of units for each module assigned to a learner can be ordered by the unit target dates rather than by the unit code.

To do this:
- Select Browse Modules on the sidebar.
- Search for the base module for which you wish to change the unit ordering.
- From the search results, click edit at the end of the row for the relevant module.
-
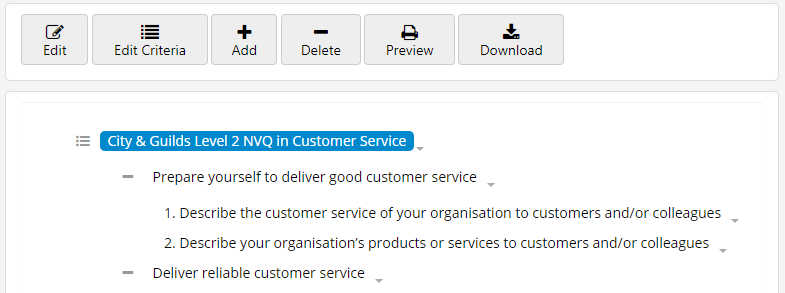
Select the top row (i.e. the base module) and click Edit.
- Scroll down the module details screen and tick the Order By Target Date box.
- Click Save at the top of the details screen.
The units for that module will now be ordered by the unit target dates on the learner homepage and the learner summary screen for assessor and employer logins. Note that if a display index has been set on the units, the target date ordering will take precedence.