Administration
Security
Maytas 5 has a wide range of security permissions which can be set by a system administrator. To view or change permissions:
- Click Tools on the toolbar.
- Click Edit Permissions on the Security panel.
There are seven areas on the Permissions ribbon:
- Users – This shows a list of users. To edit a user’s permissions, select the user and click the button. This will open a window where you can change the username, surname, first name, initials and title.
- Modules – This lets you set module visibility permissions per user. Choose the module on the left then select a visibility level from the drop-down list for each user. The three levels are Hidden, which hides the module entirely, Read only, which means the user can see it but not change it, and Visible which means the user can see and edit items within the module.
- Tabs – This lets you set tab visibility permissions per user. The visibility levels are the same as for modules.
- Centres – This lets you set centre visibility permissions per user. Each user has a checkbox which makes the chosen centre either visible or hidden.
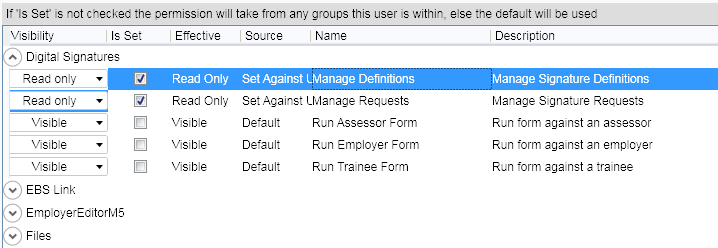
- Permissions – This lets you set user account permissions. The options are:
- Controls – This lets you set control visibility permissions per user. This works in the same way as module and tab permissions.
-
Commands – This allows you to enable or disable many of the features in Maytas. The features and functionalities are grouped by the relevant module or subject. Please see the Permissions page for details on setting permissions.

- Processes – This lets you set process visibility permissions per user. This works in the same way as above.
To change a user’s password:
- On the Users tab, right-click the relevant username on the left and select Change password.
- The top half of the window that appears allows you to amend your username, surname, first name, initials and title. The bottom half of the window lets you change your password in a number of ways:
- Change nothing – When this is selected, the password will remain the same.
- Blank password – This will effectively remove the password. This is only recommended for test user accounts, and should not be used for genuine user accounts.
- Set to username – This makes the password the same as the username. Again, this is only recommended for test user accounts, and should not be used for genuine user accounts.
- Set to – When this is selected, a new password can be entered in the box. This is recommended for the majority of users.
- Click OK to save changes.
Tasks
Maytas 5 tasks are a user-specific record and reminder of important jobs to be done. The tasks panel can be selected by clicking Tasks at the bottom left of the start page.
 To create a new task:
- Right-click on the tasks panel and select New Task.
- In the wizard, enter a summary of the task to be completed and the due date.
- The task can also be linked to a specific learner, assessor or employer (e.g. you could create a task for creating a visit for a particular learner). To do this, choose trainee, assessor or employer from the Linked to dropdown box and click the
 button to search for a particular person / employer.
 - The task must also be linked to a process, which is the task to be completed. Choose a process from the dropdown box and click Next.
- Enter a description of the task and click Next.
- Click Finish to create the task.
You will now see the task listed in the task panel. Double-click the task to open it. To run the task, right-click it and select the process from the menu (e.g. if the task process was New ILR ER Starter, this will be displayed in the menu). Once the process has been finished, you will be asked if you wish to set the task as completed. Click Yes to do so.
Different visibility levels can be set for tasks. For example, by default completed tasks are not shown, and so completing a task will remove it from the task list. To set view options:
- Right-click the task panel and select View.
- You will see a menu with a number of options. The first two options let you select whether to show uncompleted tasks, completed tasks or both. The second two options allow you to sort tasks by due, completion or creation dates in ascending or descending order. The final option allows you to go to the first complete or non-complete task, or to locate all tasks created on a specific date.
Support

The Support area of the toolbar is designed to provide quick access to important system information to the Maytas Support team, should the need arise to contact them. You can also change your password and force a system-wide synchronisation from here.
Support Options
Clicking Change Password will open a window where you can change your own password. Enter your current password and your new password (including the confirmation box) and click OK.
Clicking About will open a window displaying version information.

On the General tab, the left value (180.20 in the picture) is the database version number, which was used for Maytas 3. The right value (5.16.6850.1 in the picture) is the Maytas 5 client version number. Now that Maytas 3 has been decommissioned, only the Maytas 5 client version number will change with each upgrade.
The Modules tab shows a list of installed Maytas 5 program modules and their respective version numbers.
The Email support button opens an email window addressed to Maytas Support in your default email program (e.g. Microsoft Outlook).
The Diagnostics button opens your computer’s system information window. This contains an extensive set of information regarding your hardware and software.
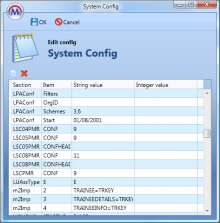
The Edit Config button allows you to add and maintain system config settings.
The Ofsted Update button updates the achievement rates cached data in the database. It is recommended to do this regularly to ensure your achievement rates data is up-to-date for reporting purposes.
The Current Usage button allows you to see which users are currently logged into Maytas. Information on enabling and using this feature can be found on the Current Usage page.
The Broadcast Message button sends out a banner message near the top of each Maytas 5 client connected to the database. This is useful in instances where, for example, you need to inform all users to log out. Once you have clicked the button, enter the message and click OK. The message will then appear after a few seconds. To remove the message, click the button and delete the contents of the box, then click OK.
The Feature Override button can be used by Maytas support when investigating issues.
The Setup ULN button lets you configure a connection to the Learning Records Service (LRS) to obtain unique learner numbers for your learners.
The Force Sync button forces all Maytas 5 clients to synchronise with the main database the next time they restart Maytas 5. This is useful if an update has been applied to the main database and it needs to be propagated across all clients. Please note that the Force Sync button may not be available to you if your system admin has not granted privileges to it.
The Help button links to this wiki.
System Config
 System config settings allow you to configure system functionality to your requirements. As of version 5.07, system configs are expected to be set via the system config editor. However, the original version remains for advanced users if they wish to use it.
For further information on the available configs, please contact Maytas support. New configs are regularly detailed in the release documentation to allow you to add and configure new features.
To access the system config, select the Support tab on the toolbar and click Edit Config on the ribbon.

Each config has a Section and Item, and then either a String value or an Integer value.
To add a new config:
- Click the
 button. This will add a blank row.
 - Enter the details as provided by Maytas.
- Click OK.
Syncing
 The Sync button can be found by clicking the Home tab on the toolbar. Its purpose is to synchronise certain data and settings between the local Maytas 5 client and the main database. When you click the Sync button, a progress bar will appear at the bottom-right of Maytas 5. The sync is complete when the progress bar disappears.

Specifically, syncing will upload from the client and download from the main database the latest data and settings for the following:
It should be noted that learner data is not transferred in the sync, as this is entered directly into the main database from Maytas 5.
Syncing is a useful tool for propagating changes across all Maytas 5 clients. For example, if a new tab is created and needs to go to every client, this can be done in the following way:
- The tab creator clicks Sync to upload the new tab to the main database.
- All other clients click Sync to retrieve the new tab from the main database.
Alternatively, the Force Sync button on the Support tab can be used to force all clients to automatically sync the next time they log into Maytas 5. This method does not require each client to click the Sync button, as the sync is performed during the login process (this is indicated with text at the bottom of the Maytas 5 splash screen before the client launches). Please note that Force Sync button may not be available if your system admin has not granted privileges to it.
Server Jobs
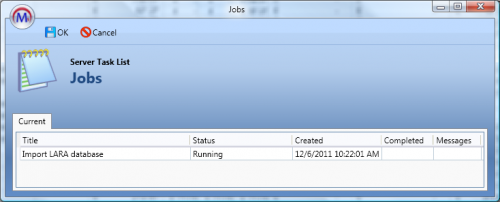
 The View Jobs button can be found by clicking the Home tab on the toolbar. It shows a list of the current Maytas 5 server jobs currently being undertaken and their status. Jobs include importing data, running profile measurements and processing ILR and LLWR exports.

Each job displays the job title, its current status, when it was created, when it was completed (if applicable) and any associated messages. The status of each job will update in real-time when the window is open.
Maximum Trainees in a Centre
Maytas has a maximum number of trainees that can be included in a centre. The format of trainee IDs allows for 1,000,000 trainees per centre. The format of an ID is:
xxxx-yyyy-zzzzzz
where xxxx is the organisation ID, yyyy is the centre number and zzzzzz is the number assigned to a trainee, which ranges from 000000 to 999999.
If the automatically generated trainee number (zzzzzz) has reached 999999, a new number generator is created for each centre. Each of these attempts to fill in the gaps for any missing numbers in a centre - e.g. if a trainee is added to centre 0001 and that centre already has trainee IDs running from 000000 to 012345, but 012346 is not used, the new trainee's ID would be xxxx-0001-012346.
If all generated numbers are assigned to trainee IDs for a centre, that centre is automatically locked so that new trainees cannot be added to it. A centre can also be manually locked by entering Y in the field CENTRE.CENTRELOCK.